Imagine waking up to a winter wonderland, with thick blankets of snow covering the entire city. While it may look picturesque, it also means that you have a big job ahead of you: clearing the snow from your rooftop. But before you bring out your trusted snowblower, you might be wondering, “Is it safe to operate a snowblower on a rooftop?” After all, the last thing you want is to end up causing damage to your roof or, even worse, putting yourself at risk. In this article, we’ll explore the safety considerations of using a snowblower on a rooftop and provide you with some valuable tips to make your snow removal a breeze.

This image is property of pixabay.com.
Preparation
Before you even think about going up on the roof with a snowblower, there are a few important steps you need to take to ensure a safe and successful snow removal experience.
Check the rooftop condition
First and foremost, you need to inspect the condition of your rooftop. Look for any signs of damage, like loose shingles or cracks. If you notice any areas that seem unstable or compromised, it’s best to avoid using a snowblower until the roof is repaired.
Inspect the snowblower
Next, take a close look at your snowblower. Check for any worn-out parts, frayed cords, or loose bolts. Make sure the machine is in good working condition before you take it up on the roof. If you notice any issues, it’s essential to address them before attempting to use the snowblower.
Choose the right snowblower
Not all snowblowers are created equal, and it’s crucial to select the right one for your specific needs. Consider the size and pitch of your roof, as well as the amount of snow you typically receive. Choose a snowblower that is powerful enough to handle the job but not too heavy for you to control safely.
Safety Measures
Safety should be your top priority when operating a snowblower on a rooftop. Taking the necessary precautions can prevent accidents and injuries.
Wear protective gear
It’s crucial to wear the proper protective gear when using a snowblower on a rooftop. This includes sturdy work boots with good traction, safety goggles or glasses to protect your eyes from flying debris, and gloves to keep your hands warm and protected. Additionally, consider wearing a helmet to protect your head in case of a fall.
Clear the area from obstacles
Before you start using the snowblower, make sure to clear the rooftop of any obstacles that could pose a tripping hazard or get caught in the machine. Remove any loose equipment or debris and create a clear path for yourself to move around safely.
Be cautious of the roof’s edge
When working near the roof’s edge, exercise extreme caution. It’s easy to lose your balance and accidentally fall off. Stay a safe distance from the edge and consider using a harness or lanyard for added security. If possible, have someone nearby to assist you in case of an emergency.

This image is property of pixabay.com.
Positioning the Snowblower
Proper positioning of the snowblower is crucial for effective and safe snow removal.
Find a stable footing
Before you start up the snowblower, make sure you have a stable footing on the roof. Avoid areas with ice or slippery surfaces. Take your time to find a solid and secure spot to position yourself.
Secure the snowblower
Ensure that the snowblower is securely and firmly positioned on the roof. Check that all the wheels or skids are properly adjusted, and the machine is level. This will prevent any unnecessary movements or tipping over while you’re operating the snowblower.
Avoid pointed or raised positions
When positioning the snowblower, it’s crucial to avoid placing it in a pointed or raised position. This can lead to instability and make it harder to control the machine. Keep it flat and level to ensure optimal performance and safety.
Using the Snowblower
Once the preparations are complete, it’s time to start using the snowblower to clear the snow off your rooftop.
Start at the center
To efficiently remove snow from your rooftop, begin at the center and work your way outwards. This will prevent the snow from piling up near the edges and causing unnecessary weight and stress on the roof.
Move in straight lines
When operating the snowblower, it’s best to move in straight lines. This will ensure thorough snow removal and prevent the buildup of snow on the roof. Avoid making sharp turns or changing directions abruptly, as this may cause the snowblower to lose balance or damage the roof surface.
Avoid excessive force
While it may be tempting to use excessive force to clear heavy snow, it’s important to remember that this can put unnecessary strain on the snowblower and potentially damage the roof. Let the machine do the work and allow it to efficiently remove the snow without exerting excessive force.

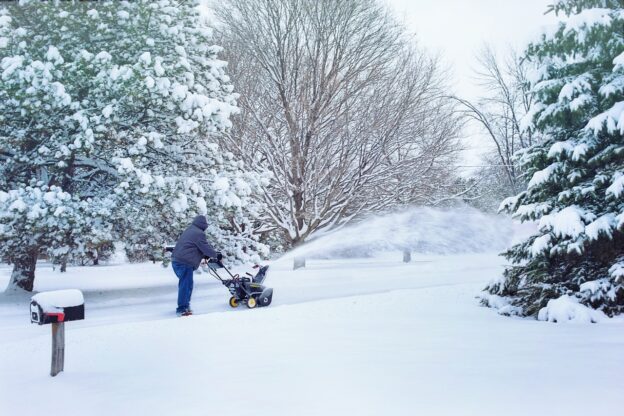
This image is property of pixabay.com.
Clearing Snow Near the Edge
Clearing snow near the roof’s edge requires extra caution to avoid accidents and damage to the roof.
Use caution near the roof’s edge
When you reach the roof’s edge, slow down and be extremely cautious. The edge can be icy or slippery, making it easy to lose your balance. Take small and deliberate steps, and be aware of your surroundings.
Avoid throwing snow off the roof
It’s important to avoid throwing snow off the roof when using a snowblower. This can be dangerous for people down below and may cause damage to property. Instead, aim to direct the snow to a safe area on the ground or use a snow removal method that doesn’t involve launching the snow off the roof.
Handling Heavy or Wet Snow
Clearing heavy or wet snow can be more challenging, but with the right approach, you can still get the job done safely.
Take smaller passes
When dealing with heavy or wet snow, it’s best to take smaller passes with the snowblower. Trying to tackle too much snow at once can put excessive strain on the machine and increase the risk of clogging. Take your time and work in smaller sections for more effective snow removal.
Adjust the snowblower height
If you’re dealing with particularly heavy snow, you may need to adjust the height of the snowblower to ensure it can effectively clear the snow. Lower the height to the appropriate level for your specific snow conditions, and regularly check for any clogs or obstructions.
Clear snow promptly
It’s important to clear snow promptly after a snowfall, especially if it’s heavy or wet. Allowing the snow to accumulate can make the removal process more difficult and put additional stress on your roof. Regularly check the weather forecasts and stay on top of snow removal to prevent any potential hazards.

Maintenance and Storage
Proper maintenance and storage of your snowblower are essential for its longevity and safe operation.
Clean and inspect the snowblower
After each use, take the time to clean and inspect your snowblower. Remove any built-up snow and debris, and ensure that all parts are in good working condition. Regularly check the fuel and oil levels and address any issues promptly.
Store the snowblower properly
When the snow season is over, store your snowblower in a clean and dry place. Ideally, keep it in a protected area, such as a shed or garage, to prevent it from getting damaged by the elements. Follow the manufacturer’s guidelines for long-term storage to ensure it’s ready for the next winter season.
Regularly check for damage
Before using your snowblower each season, thoroughly inspect it for any signs of damage. Look for worn-out parts, loose bolts, or any other issues that may affect its performance or safety. Address any necessary repairs promptly or consult a professional if you’re unsure.
Professional Assistance
While using a snowblower on your rooftop can be a DIY task, there may be instances where it’s best to seek professional assistance.
Consider hiring a professional
If you’re not comfortable or experienced in operating a snowblower on a roof, it may be wise to hire a professional snow removal service. They have the expertise and equipment to safely and efficiently remove snow, ensuring minimal risk to you and your property.
Consult an expert before starting
If you’re unsure about whether using a snowblower on your rooftop is the best option, it’s always a good idea to consult with a roofing professional or an expert in snow removal. They can assess your specific situation and provide guidance on the safest and most effective method for snow removal.
Get assistance for taller rooftops
If you have a particularly tall or steep rooftop, consider getting assistance from professionals who specialize in high-risk snow removal situations. They have the necessary training and equipment to handle these challenging scenarios and can ensure the job is done safely.

Alternative Roof Snow Removal Methods
Using a snowblower is not the only option for removing snow from your rooftop. Here are a few alternative methods you can explore:
Using a roof rake
A roof rake is a long-handled tool specifically designed for snow removal from rooftops. It allows you to reach and clear snow from the ground, eliminating the need to climb onto the roof. Regularly use the roof rake to prevent snow buildup and minimize the load on your roof.
Applying calcium chloride
Calcium chloride is a chemical compound that can help melt snow and ice on your rooftop. By strategically placing calcium chloride in ice dams or snowy areas, you can accelerate the melting process and prevent further damage to your roof. However, it’s important to follow the manufacturer’s instructions and use caution when handling chemicals.
Infrared roof heating system
An infrared roof heating system is an advanced option for snow removal. It involves installing heating elements under the roof surface that melt the snow as it accumulates. While this method can be effective, it requires professional installation and can be costly.
Conclusion
Operating a snowblower on a rooftop can be a safe and efficient way to remove snow, but it requires proper preparation, safety measures, and technique. Before attempting to clear your rooftop, evaluate the risks and benefits, and ensure you follow the safety guidelines provided. If you’re unsure or uncomfortable, don’t hesitate to seek professional help. The most important thing is to prioritize safety and protect yourself and your property while tackling the winter snow.