Tag Archives: Cleaning

How Often Should I Clean My Snowblower’s Air Filter?

So you’ve got a trusty snowblower to help you battle through those frosty winter days. But have you ever wondered how often you should be giving your snowblower’s air filter a good clean? Well, look no further for answers. In this article, we’ll uncover the importance of maintaining a clean air filter, the signs that suggest it’s time for a cleaning, and provide helpful tips on how frequently you should be tackling this task. So sit back, relax, and let’s get your snowblower ready to take on winter’s snowy onslaught!

Factors Affecting Air Filter Cleaning Frequency

Maintaining a clean air filter is crucial for the optimal performance and longevity of your snowblower. Several factors can affect how frequently you should clean your snowblower’s air filter.

Frequency of Use

The frequency with which you use your snowblower plays a significant role in determining how often you should clean the air filter. If you use your snowblower frequently, especially during heavy snowfall or in large areas, the air filter may accumulate dirt and debris more quickly. In such cases, it is advisable to clean the air filter more frequently to ensure uninterrupted performance.

Conditions of Use

The conditions in which you operate your snowblower also impact the cleaning frequency of the air filter. If you use your snowblower in dusty or dirty environments, such as areas with loose gravel or construction sites, the air filter is more likely to become clogged with debris. Similarly, operating the snowblower in wet or humid conditions can lead to the accumulation of moisture in the air filter, which may require more frequent cleaning.

Air Quality

The air quality in your location can have a significant impact on how often you should clean your snowblower’s air filter. If you live in an area with high levels of airborne pollutants, such as dust, pollen, or industrial emissions, the air filter is likely to become dirty faster. Regular cleaning is necessary to prevent the filter from becoming clogged, as a clogged filter can reduce the snowblower’s performance and potentially cause engine damage.

Type of Fuel Used

The type of fuel you use in your snowblower can also affect the cleaning frequency of the air filter. Some fuels, such as ethanol-blended gasoline, can leave behind residue that can accumulate on the air filter. This residue can restrict airflow and decrease the efficiency of the snowblower. If you consistently use fuels that are known to leave residue, you may need to clean the air filter more often to maintain optimal performance.

Signs That Your Snowblower’s Air Filter Needs Cleaning

Cleaning the air filter of your snowblower is essential to ensure its smooth operation. However, it can be challenging to determine exactly when the air filter needs cleaning. Here are some signs that indicate it’s time to clean your snowblower’s air filter:

Reduced Power and Performance

If you notice a decrease in the power and performance of your snowblower, it might be an indication that the air filter is dirty. A clogged air filter restricts airflow, which can lead to reduced engine power and diminished overall performance. Cleaning or replacing the air filter can help restore the snowblower’s power and efficiency.

Difficulty Starting

A dirty air filter can make it difficult for the snowblower to start. If you experience issues with starting your snowblower, particularly if it used to start easily before, the air filter may be clogged. Cleaning the air filter can remove any obstructions and improve the starting process.

Excessive Fuel Consumption

If your snowblower is consuming fuel at a faster rate than usual, it could be a sign of a dirty air filter. A clogged air filter restricts the airflow, causing the engine to run inefficiently and consume more fuel to generate the required power. Cleaning or replacing the air filter can help restore normal fuel consumption.

Dirty or Clogged Filter

A visual inspection of the air filter can also give you an indication of its cleanliness. If the filter appears dirty, clogged, or covered in debris, it is a clear sign that it needs cleaning. Removing the filter and cleaning it thoroughly can prevent further issues and ensure optimal performance.

How Often Should I Clean My Snowblowers Air Filter?

Recommended Cleaning Schedule for Snowblower Air Filter

To ensure that your snowblower operates at its best, it is important to follow a regular cleaning schedule for the air filter. Here are some guidelines to help you establish a cleaning routine:

Manufacturer’s Recommendations

The manufacturer of your snowblower is the best source of information when it comes to maintenance recommendations, including cleaning the air filter. Read the owner’s manual or consult the manufacturer’s website to determine their specific recommendations regarding the cleaning frequency of the air filter.

Every 10 Hours of Use

As a general rule of thumb, it is recommended to clean your snowblower’s air filter every 10 hours of use. This interval provides a balance between ensuring optimal performance and avoiding excessive cleaning. Regular cleaning at this interval can help prevent debris accumulation and maintain the snowblower’s efficiency.

Monthly Inspection

In addition to the periodic cleaning every 10 hours of use, it is also advisable to inspect the air filter monthly. This visual check allows you to identify any signs of dirt or damage that may require immediate attention. Regular inspections can help catch issues early on and prevent major problems down the line.

Regular Visual Check

Make it a habit to visually inspect the air filter before each use of your snowblower. Look for any visible dirt, debris, or damage, and clean or replace the filter as needed. Regular visual checks ensure that the air filter is clean and in good condition, promoting optimal performance.

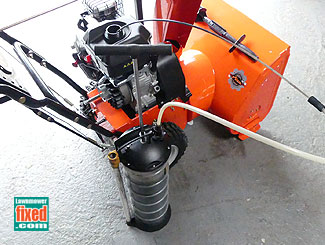
Step-by-Step Guide: How to Clean a Snowblower’s Air Filter

Cleaning the air filter of your snowblower is a relatively simple process that can be done at home. Follow these step-by-step instructions to clean your snowblower’s air filter effectively:

Step 1: Gather Required Tools

Before you begin, gather the necessary tools and supplies. You will need protective gloves, safety eyewear, a clean cloth or brush, and compressed air (optional). Having these tools easily accessible will make the cleaning process efficient and safe.

Step 2: Turn off the Snowblower

Ensure that the snowblower is turned off and the engine is cool before attempting to clean the air filter. This step is crucial to prevent any accidental injuries or damage to the snowblower.

Step 3: Remove the Air Filter Cover

Locate the air filter cover on your snowblower. It is usually located near the engine and can be identified by its distinctive shape and design. Remove the cover carefully by unscrewing or unclipping it, depending on the model of your snowblower.

Step 4: Inspect the Air Filter

Once the cover is removed, visually inspect the air filter for dirt, dust, or debris accumulation. Shake the filter gently to dislodge any loose particles. If the filter is excessively dirty or damaged, it may need to be replaced instead of cleaned.

Step 5: Clean the Air Filter

If the air filter is relatively clean, you can proceed with cleaning it. Use a clean cloth or brush to remove the visible dirt and debris from both sides of the filter. Ensure that all the dirt is removed, but be careful not to damage the filter material in the process.

Step 6: Reinstall the Air Filter

After cleaning the air filter, carefully place it back in position. Ensure that it fits snugly and is correctly aligned with the filter housing. If the filter requires any special installation or alignment, refer to the manufacturer’s instructions.

Step 7: Replace the Air Filter if Necessary

If the air filter is heavily damaged, excessively dirty, or cannot be adequately cleaned, it is recommended to replace it with a new filter. Check the owner’s manual or consult the manufacturer to ensure you purchase the correct replacement filter for your specific snowblower model.

How Often Should I Clean My Snowblowers Air Filter?

Precautions to Take When Cleaning a Snowblower’s Air Filter

While cleaning the air filter of your snowblower is a relatively straightforward task, it is essential to take certain precautions to ensure your safety and avoid damage to the equipment.

Wearing Protective Gloves and Eyewear

Before you start the cleaning process, put on protective gloves and safety eyewear. This will protect your hands and eyes from any dirt, debris, or harmful particles that may be present on the air filter or within the snowblower.

Cleaning in a Well-Ventilated Area

Ensure that you clean the air filter in a well-ventilated area. This will prevent the inhalation of any dust or particles that may be released during the cleaning process. Cleaning in a well-ventilated space also helps minimize the exposure to cleaning solvents or compressed air fumes if used.

Avoiding Damage to the Air Filter

Take care not to damage the air filter while cleaning it. Use gentle, sweeping motions with a cloth or brush to remove dirt and debris. Avoid excessive force that may tear or distort the filter material. Damaged filters may not provide adequate filtration and can compromise the performance of your snowblower.

Using Compressed Air Carefully

If you choose to use compressed air to clean the air filter, use caution. High-pressure air can damage or dislodge delicate filter material. Hold the compressed air nozzle several inches away from the filter and blow air in short bursts. This will help remove any stubborn debris without causing damage.

Other Maintenance Tips for Keeping Your Snowblower in Top Condition

In addition to regular air filter maintenance, there are several other essential maintenance tasks to keep your snowblower in top condition. Incorporating these tasks into your overall maintenance routine will ensure that your snowblower operates reliably and efficiently:

Regular Oil Changes

Regularly changing the oil in your snowblower is crucial for maintaining its smooth operation. Consult the owner’s manual for the recommended oil change intervals and use the appropriate oil specified by the manufacturer. Clean oil lubricates the engine and keeps it running smoothly, reducing wear and tear.

Inspecting and Adjusting Drive Belt Tension

Inspecting and adjusting the drive belt tension is necessary to ensure proper traction and power transfer in your snowblower. Over time, the drive belt can become loose or stretched, leading to reduced efficiency. Regularly inspect the drive belt and adjust the tension as recommended by the manufacturer.

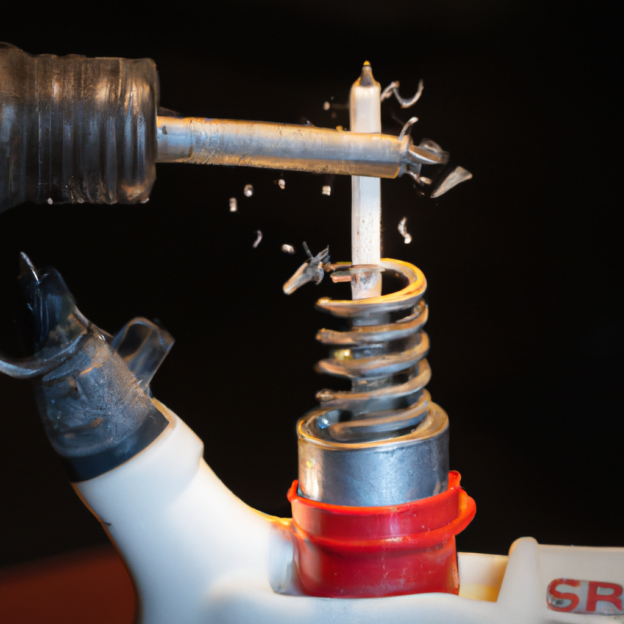
Checking and Replacing Spark Plugs

Spark plugs play a vital role in the ignition process of your snowblower’s engine. Regularly inspecting and cleaning spark plugs can help maintain efficient combustion and prevent issues like misfires or difficulty starting. If the spark plug is excessively worn or damaged, it should be replaced with a new one.

Cleaning the Carburetor

A clean carburetor is essential for proper fuel delivery and combustion in the snowblower’s engine. Over time, the carburetor can become clogged with dirt, debris, or fuel deposits. Regularly cleaning the carburetor or using a fuel additive can prevent clogging and ensure optimal engine performance.

Benefits of Cleaning Your Snowblower’s Air Filter Regularly

Regularly cleaning your snowblower’s air filter offers a range of benefits that positively impact its performance and longevity.

Improved Performance and Efficiency

A clean air filter allows for optimal airflow, ensuring efficient combustion within the snowblower’s engine. This leads to improved performance and enhanced fuel efficiency. By removing any dirt or debris that may restrict airflow, you can ensure that your snowblower operates at its best during the winter season.

Longer Lifespan of Engine

A clogged or dirty air filter can negatively impact the lifespan of your snowblower’s engine. Restricted airflow can cause the engine to work harder, potentially leading to overheating or premature wear and tear. Cleaning the air filter regularly reduces strain on the engine and helps prolong its lifespan.

Reduced Risk of Damage and Costly Repairs

A clean air filter prevents debris and dirt from reaching the internal components of the engine. By keeping the engine free from contaminants, you reduce the risk of damage to critical parts, such as the piston or cylinder. This reduces the likelihood of costly repairs and extends the overall lifespan of your snowblower.

Enhanced Safety and Reliability

A properly maintained air filter contributes to the overall safety and reliability of your snowblower. By ensuring optimal engine performance, you minimize the chances of unexpected breakdowns or malfunctions while operating the snowblower. This allows you to clear snow from your property with confidence and peace of mind.

Different Types of Air Filters for Snowblowers

Snowblowers can utilize various types of air filters, each with its own characteristics and benefits. Understanding the different types can help you choose the most suitable filter for your snowblower:

Foam Filters

Foam filters are commonly used in snowblowers due to their excellent filtration capabilities. They are designed to trap fine particles and debris effectively while allowing free airflow. Foam filters are generally washable and reusable, making them a cost-effective option in the long run.

Paper Filters

Paper filters are another common type used in snowblowers. They are typically disposable and offer good filtration performance. Paper filters can effectively trap larger particles and debris, providing adequate protection to the engine. Regular replacement is necessary to ensure optimal performance and maintain the snowblower’s efficiency.

Mesh Filters

Mesh filters, often made of metal or synthetic materials, are known for their durability and resistance to damage. They offer good filtration performance and are capable of capturing larger debris effectively. Mesh filters are generally washable and reusable, making them a suitable option for those looking for a more sustainable choice.

Cone Filters

Cone filters, also known as high-performance filters, are designed to provide superior filtration and airflow. They feature a cone-shaped design that maximizes surface area, allowing for increased filtration capacity. Cone filters are often made of high-quality materials and can offer enhanced performance in challenging operating conditions.

When to Replace Your Snowblower’s Air Filter

While regular cleaning is essential to maintain the air filter’s performance, there are instances where replacement becomes necessary. Here are some signs that indicate it’s time to replace your snowblower’s air filter:

Signs of Irreparable Damage

If the air filter is damaged beyond repair, such as tears, holes, or significant deformation, it is crucial to replace it immediately. A damaged filter cannot effectively filter the incoming air, putting the engine at risk of damage.

Excessive Wear and Tear

Over time, air filters can experience wear and tear, affecting their filtration and airflow capabilities. If you notice signs of significant deterioration, such as worn-out filter material or reduced structural integrity, it is advisable to replace the air filter.

Manufacturer’s Recommendations

Always refer to the manufacturer’s recommendations regarding the replacement intervals for your snowblower’s air filter. Filters should be replaced according to the guidelines provided by the manufacturer to ensure optimal engine performance and reliability.

Lack of Efficiency despite Cleaning

If you have thoroughly cleaned the air filter and it still does not exhibit proper filtration or airflow, it may be time to replace it. A filter that cannot be adequately cleaned or shows no improvement in performance after cleaning indicates that it has exceeded its useful life.

Conclusion

Regular maintenance and cleaning of your snowblower’s air filter are vital to ensure its optimal performance and longevity. By understanding the factors affecting air filter cleaning frequency, identifying signs that indicate the need for cleaning, and following a recommended cleaning schedule, you can keep your snowblower operating at its best.

Taking precautions when cleaning the air filter, such as wearing protective gear and working in a well-ventilated area, is essential for safety and effectiveness. Additionally, incorporating other maintenance tasks, such as regular oil changes and inspecting critical components, helps keep your snowblower in top condition.

By cleaning your snowblower’s air filter regularly, you can benefit from improved performance, extended engine lifespan, reduced risk of damage, and enhanced safety and reliability. Be aware of the different types of air filters available and know when it’s time to replace the filter to maintain optimal filtration and airflow.

As a responsible snowblower owner, taking care of your equipment through proper air filter maintenance and overall maintenance routine ensures long-term benefits, efficient snow clearing, and peace of mind throughout the winter season.

How Do I Clean The Fuel Tank Of My Snowblower?

So you’ve noticed that your trusty snowblower isn’t running as smoothly as it used to, and you suspect that a dirty fuel tank might be to blame. Don’t worry, you’re not alone in this predicament. Many snowblower owners have faced the same issue and successfully cleaned their fuel tanks to restore their machine’s performance. In this article, we will guide you through the process of cleaning the fuel tank of your snowblower, ensuring that it runs like a dream in clearing away that pesky winter snow.

How Do I Clean The Fuel Tank Of My Snowblower?

This image is property of www.lawnmowerfixed.com.

Inspecting the Fuel Tank

When it comes to cleaning the fuel tank of your snowblower, the first step is to thoroughly inspect its condition. This is important as it allows you to identify any potential issues that may need to be addressed before proceeding with the cleaning process.

Checking for Fuel Contamination

One of the things you should look out for during the inspection is fuel contamination. Over time, dirt, debris, and water can find their way into the fuel tank, causing the fuel to become contaminated. This can lead to a variety of issues, such as engine misfires or poor performance.

To check for fuel contamination, start by removing the fuel cap and visually inspecting the fuel. If you notice any discoloration, presence of dirt or debris, or separation of water from the fuel, it is a clear indication that the fuel has been contaminated.

Examining for Rust or Corrosion

Another crucial aspect of inspecting the fuel tank is examining it for any signs of rust or corrosion. Snowblowers often operate in harsh weather conditions, which can cause the fuel tank to develop rust or corrosion over time. These issues can compromise the integrity of the tank and lead to leaks or fuel system malfunctions.

To examine for rust or corrosion, carefully inspect the interior and exterior of the fuel tank. Look for any areas where the paint may have chipped or peeled off, as these can be potential spots for rust to develop. Additionally, check for any signs of discoloration, pitting, or flaking on the tank’s surface.

Inspecting for Leaks or Cracks

Lastly, don’t forget to inspect the fuel tank for any leaks or cracks. Even the smallest cracks can result in fuel leakage, which can be dangerous and affect the performance of your snowblower. Carefully examine the tank for any visible signs of leaks, such as stains or dampness around the tank or fuel lines.

To conduct a more thorough inspection for leaks, you can also perform a pressure test. This involves pressurizing the fuel tank and checking if there is any loss in pressure over time. If you notice any abnormal pressure loss or fuel seepage, it is an indication that there may be leaks present.

Preparing for Fuel Tank Cleaning

Now that you have completed the inspection of the fuel tank and identified any potential issues, it’s time to prepare for the actual cleaning process. Proper preparation ensures that the cleaning goes smoothly and helps minimize the risk of accidents or damage to your snowblower.

Gathering Necessary Tools and Materials

Before you begin cleaning, gather all the necessary tools and materials. This will save you time and make the process much more efficient. Some of the essential items you will need include:

  • Safety goggles and gloves: These will protect your eyes and hands from any potential splashes of fuel or cleaning agents.

  • Screwdrivers or wrenches: These tools will be required for disconnecting fuel lines and detaching the fuel tank.

  • Cleaning solutions: Choose a suitable cleaning solution specifically designed for fuel tanks. Avoid using harsh chemicals that may damage the tank or its components.

  • Scrub brush or cloth: Use a non-abrasive scrub brush or cloth to clean the interior of the fuel tank.

  • Water source: You will need access to a water source for rinsing the tank. A hose or bucket of water can be used for this purpose.

Ensuring Safety Measures

Safety should always be a top priority when working with fuel and cleaning chemicals. Before you start the cleaning process, take the necessary safety precautions to protect yourself and prevent accidents. Here are a few safety measures to keep in mind:

  • Perform the cleaning process in a well-ventilated area to avoid inhaling any fumes or vapors.

  • Ensure that there are no open flames or sources of ignition near the working area.

  • Avoid smoking or using any electronic devices that could spark.

  • Keep a fire extinguisher nearby in case of emergencies.

  • Follow the instructions and warnings provided by the manufacturer of the cleaning solutions and fuel.

By taking these safety measures, you can ensure a safe and hassle-free fuel tank cleaning process.

How Do I Clean The Fuel Tank Of My Snowblower?

This image is property of www.lawnmowerfixed.com.

Emptying the Fuel Tank

Before you can proceed with cleaning the fuel tank, you need to empty it completely. This will allow you to work with an empty tank and prevent any fuel spillage or accidents during the cleaning process.

Locating the Fuel Tank Drain

The first step in emptying the fuel tank is to locate the fuel tank drain. The drain is a small valve or plug located at the bottom of the fuel tank. It allows you to release the fuel from the tank and drain it out completely.

Consult your snowblower’s manual or refer to the manufacturer’s instructions to find the exact location of the fuel tank drain. In most cases, it is situated near the base of the fuel tank, usually at the rear or side of the machine.

Removing Fuel from the Tank

Once you have located the fuel tank drain, place a suitable container or fuel-safe receptacle beneath it to catch the fuel. Ensure that the container has sufficient capacity to hold the entire contents of the fuel tank.

Using a wrench or screwdriver, loosen the valve or plug and allow the fuel to drain out completely. It may take some time for all the fuel to drain, so be patient and ensure that no fuel spills onto the ground or your surroundings.

Draining the Remaining Fuel

After draining the fuel using the tank drain, there may still be some residual fuel remaining in the tank. To remove this remaining fuel, you can either tilt the snowblower or use a hand pump or syringe to suction out the remaining fuel.

Ensure that you have a suitable container to transfer the fuel from the snowblower to avoid any spillage. Take caution while tilting the snowblower to prevent any damage or injury.

Once you have emptied the fuel tank as much as possible, you are ready to move on to the next step of the cleaning process.

Removing the Fuel Tank

Now that the fuel tank is empty, it’s time to remove it from your snowblower. Removing the fuel tank allows for better access during the cleaning process and ensures that you can clean it thoroughly.

Disconnecting Fuel Lines

Before you can remove the fuel tank, you need to disconnect the fuel lines that connect it to the snowblower’s engine. These fuel lines carry fuel from the tank to the engine, and they need to be detached to remove the tank.

Locate the connections where the fuel lines are attached to the fuel tank. Depending on your snowblower model, you may need to use a wrench or screwdriver to loosen the fittings. Be careful not to damage the fuel lines while disconnecting them.

Detaching the Fuel Tank

Once the fuel lines are disconnected, you can proceed to detach the fuel tank from the snowblower. The tank may be secured to the snowblower using bolts, screws, or mounting brackets. Use the appropriate tools to remove these fasteners and detach the tank.

Take note of the tank’s position and orientation as you remove it. This will be important when it comes time to reattach the fuel tank later on.

With the fuel tank successfully removed, you are now ready to thoroughly clean it.

How Do I Clean The Fuel Tank Of My Snowblower?

This image is property of www.lawnmowerfixed.com.

Cleaning the Fuel Tank

Cleaning the fuel tank is a crucial step in maintaining the performance and longevity of your snowblower. Over time, debris, sediment, and other contaminants can accumulate inside the tank, affecting the fuel system’s efficiency.

Removing Debris and Sediments

Start the cleaning process by removing any visible debris or sediments from the fuel tank. You can do this by shaking the tank vigorously to dislodge loose particles. Once dislodged, carefully pour out the debris and sediment from the tank. Dispose of them properly and refrain from disposing of them in your regular garbage.

Using Cleaning Solutions

After removing the debris, it’s time to use cleaning solutions specifically designed for fuel tank cleaning. These solutions are designed to break down and remove stubborn contaminants, such as sludge or varnish that may have formed inside the tank.

Follow the instructions provided by the manufacturer of the cleaning solution to ensure safe and effective usage. In most cases, you will need to mix the cleaning solution with water before applying it to the tank.

Scrubbing the Tank Interior

With the cleaning solution applied, use a non-abrasive scrub brush or cloth to scrub the interior of the fuel tank. Pay extra attention to any areas where the debris or sediments were particularly stubborn.

Scrub in a circular motion, ensuring that you cover all areas inside the tank. The gentle scrubbing action helps to dislodge any remaining contaminants and ensures a thorough cleaning.

Cleaning the Tank Cap and Filter

While cleaning the fuel tank, don’t forget to pay attention to the tank cap and filter. These components can also accumulate dirt and debris over time, affecting their functionality.

Remove the tank cap and filter and clean them separately. You can use a combination of mild detergent and water to clean these components. Ensure that you rinse them thoroughly and allow them to dry completely before reattaching them.

Rinsing and Drying the Fuel Tank

After scrubbing the tank interior and cleaning the cap and filter, it is essential to rinse the fuel tank thoroughly to remove any leftover cleaning solution or residue.

Flushing the Tank with Water

Using a hose or bucket of clean water, thoroughly rinse the interior of the fuel tank. Allow the water to flow freely through the tank to flush out any remaining cleaning solution or loosened contaminants.

While rinsing, pay close attention to the tank’s drain or outlet to ensure that no debris or sediment gets lodged there. Continue rinsing until the water coming out of the tank is clear and free from any residue.

Allowing the Tank to Dry Completely

Once the tank has been thoroughly rinsed, it is crucial to allow it to dry completely before reattaching it to the snowblower. Moisture can promote the growth of bacteria or cause rust to develop inside the tank, compromising its integrity.

To facilitate drying, place the fuel tank in a well-ventilated area and allow it to air dry naturally. Avoid using any heat sources or accelerants to speed up the drying process, as this can be dangerous and potentially damage the tank.

How Do I Clean The Fuel Tank Of My Snowblower?

This image is property of www.lawnmowerfixed.com.

Inspecting and Replacing Fuel Tank Components

With the fuel tank clean and dry, it’s time to inspect its components for any signs of wear or damage. This step ensures that your snowblower’s fuel system is in optimal condition and helps prevent future issues.

Inspecting Fuel Lines

Carefully examine the fuel lines for any signs of cracks, leaks, or deterioration. Flex the lines gently to check for any brittleness or stiffness, which can indicate the need for replacement.

If you notice any issues with the fuel lines, it is recommended to replace them to avoid potential fuel leaks or disruptions in fuel flow.

Checking and Replacing Filters

Inspect the fuel filter for any signs of clogging or damage. A clogged fuel filter can restrict fuel flow, leading to poor engine performance.

If the fuel filter appears dirty or clogged, it is advisable to replace it with a new one. This ensures that the fuel entering the engine is free from contaminants and allows for optimal performance.

Examining Tank Cap

Lastly, examine the tank cap for any signs of damage, such as cracks or worn-out seals. A faulty tank cap can allow dirt, water, or debris to enter the fuel tank, leading to contamination.

If you notice any issues with the tank cap, it is essential to replace it to maintain the integrity of the fuel tank and prevent further contamination.

Reattaching the Fuel Tank

After inspecting and replacing any necessary components, it’s time to reattach the fuel tank to your snowblower. Properly securing the fuel tank ensures that it stays in place during operation and prevents any potential fuel leaks.

Connecting Fuel Lines

Begin by reconnecting the fuel lines to the fuel tank. Align the fittings and tighten them properly using the appropriate tool. Ensure that the fuel lines are securely attached to prevent any fuel leaks or disruptions in fuel flow.

Securing the Fuel Tank

Once the fuel lines are connected, it’s time to secure the fuel tank back onto the snowblower. Align the tank with the mounting brackets or fastening points and insert the bolts or screws to hold it in place.

Use the necessary tools to tighten the fasteners securely, but be careful not to overtighten and risk damaging the tank or its mounting points. Take note of the tank’s proper alignment based on its original position and orientation during removal.

How Do I Clean The Fuel Tank Of My Snowblower?

This image is property of www.lawnmowerfixed.com.

Refilling the Fuel Tank

With the fuel tank securely reattached to your snowblower, it’s time to refill it with the appropriate fuel. Choosing the right fuel type is crucial for optimal performance and to prevent potential engine damage.

Choosing the Right Fuel Type

Refer to your snowblower’s manual for the recommended fuel type. Typically, snowblowers run on unleaded gasoline with an octane rating of 87 or higher. Avoid using ethanol-blended fuels, as they can cause corrosion and other issues in the long run.

Ensure that the fuel you use is fresh and free from any contaminants or water. Store fuel in a clean, approved container to maintain its quality.

Pouring Fuel into the Tank

Carefully pour the fuel into the fuel tank, ensuring that you do not spill any fuel on your snowblower or its surroundings. Avoid overfilling the tank to prevent fuel overflow and spills.

Once the fuel tank is filled, securely tighten the tank cap to prevent any fuel leakage or evaporation. Make sure the cap’s seal is intact and functioning properly.

Final Checks and Testing

Before you start using your snowblower again, it is crucial to perform a few final checks to ensure everything is in order and ready for operation.

Checking for Fuel Leaks

Inspect the fuel tank and the fuel lines for any signs of leaks. Look for any drips, stains, or puddles of fuel that may indicate a leak. If you notice any leaks, immediately address the issue before using your snowblower.

Testing the Snowblower

Once you have completed all the necessary steps to clean the fuel tank and reassemble the snowblower, it’s time to test it. Start the snowblower and let it run for a few minutes to ensure that the fuel flows smoothly and the engine operates correctly.

Listen for any unusual sounds or vibrations that may indicate an issue. Additionally, pay attention to the snowblower’s performance and make sure it is operating at its optimal level.

By following these comprehensive steps, you can effectively clean the fuel tank of your snowblower and ensure its optimal performance. Regular maintenance and cleaning of the fuel tank will not only prolong the life of your snowblower but also help you avoid costly repairs and inconvenience in the long run.

How Do I Clean The Spark Plug On My Snowblower?

So, you’ve got yourself a snowblower and you’re ready to tackle those winter storms head-on. But before you rev it up and start clearing the snow like a champion, there’s one important step you don’t want to overlook – cleaning the spark plug. The spark plug is a crucial component of your snowblower’s engine, responsible for igniting the fuel-air mixture and keeping everything running smoothly. If it’s clogged or dirty, your snowblower may not start or run efficiently. Luckily, cleaning the spark plug is a fairly simple task that you can do yourself. In this article, we’ll walk you through the steps on how to clean the spark plug on your snowblower, so you can keep it in top shape all season long.

How Do I Clean The Spark Plug On My Snowblower?

Reasons to clean the spark plug

Cleaning the spark plug in your snowblower is an important maintenance task that shouldn’t be overlooked. There are several reasons why you should regularly clean the spark plug.

Improve performance

A clean spark plug can significantly improve the performance of your snowblower. Over time, the spark plug can become dirty and clogged with carbon deposits, which can hinder its ability to ignite the fuel-air mixture properly. By cleaning the spark plug, you ensure that it can deliver a strong, consistent spark, resulting in better engine performance and smoother operation.

Prevent starting issues

A dirty spark plug can also cause starting issues. If the spark plug is coated with carbon deposits or other contaminants, it may not produce a strong enough spark to ignite the fuel in the engine. This can lead to difficulty starting the snowblower or even prevent it from starting altogether. By keeping the spark plug clean, you can avoid these frustrating starting problems and ensure that your snowblower is always ready to go when you need it.

Extend plug life

Regularly cleaning the spark plug can help extend its life. When the spark plug is dirty or clogged, it has to work harder to produce a spark. This can lead to increased wear and tear on the electrode and insulator, potentially shortening the lifespan of the plug. By cleaning the spark plug regularly, you can remove any contaminants that may be causing premature wear and extend the overall life of the plug.

Preparation

Before you begin cleaning the spark plug on your snowblower, there are a few steps you should take to ensure your safety and make the process easier.

Turn off the snowblower

First and foremost, turn off your snowblower and make sure the engine is completely shut down. This will prevent any accidental starts and keep you safe while working on the spark plug.

Allow the engine to cool

Next, allow the engine to cool down. The spark plug and surrounding areas can become very hot during operation, so it’s important to give it enough time to cool off before attempting to remove the spark plug.

Gather necessary tools

Lastly, gather the necessary tools for the job. You will need a socket wrench or spark plug socket, a wire brush, and possibly a pair of pliers or spark plug boot puller to disconnect the spark plug wire. Having these tools on hand will make the process much easier and more efficient.

Removing the spark plug

Once you have properly prepared, it’s time to remove the spark plug from your snowblower. Here’s how:

Locate the spark plug

The spark plug is typically located on the side of the engine, near the cylinder head. Refer to your snowblower’s manual or look for a small, cylindrical component with a wire attached to it. This is the spark plug.

Disconnect the spark plug wire

Using a pair of pliers or a spark plug boot puller, gently grasp the spark plug wire and pull it away from the spark plug. Be careful not to pull on the wire itself, as this can damage it. Instead, focus on gripping the boot or connector and pulling straight back.

Remove the spark plug

With the spark plug wire disconnected, use a socket wrench or spark plug socket to loosen and remove the spark plug from the engine. Turn the wrench or socket counterclockwise to loosen it and then remove it by hand. Set the spark plug aside in a clean, safe place.

How Do I Clean The Spark Plug On My Snowblower?

Inspecting the spark plug

Now that the spark plug is removed, it’s time to inspect it for any signs of damage or wear. This inspection will help you determine if cleaning is necessary or if the spark plug needs to be replaced.

Examine the spark plug

Take a close look at the spark plug. Look for any signs of damage, such as cracks or chips in the ceramic insulator or electrode. Additionally, check for any excessive carbon deposits or oil fouling on the spark plug. These can indicate other issues with the engine that may need to be addressed.

Check for signs of damage

Inspect the electrode and center electrode, looking for signs of wear or erosion. The electrode should have a flat, smooth surface, and the spark plug should have a consistent gap between the electrodes. If you notice any irregularities, such as a worn-down electrode or a widened gap, it may be time to replace the spark plug.

Assess the electrode condition

The condition of the electrode can tell you a lot about the performance of your snowblower’s engine. If the electrode is covered in black, oily deposits, it could indicate rich fuel mixture or oil burning issues. On the other hand, a white, powdery residue may suggest a lean fuel mixture. Take note of any unusual conditions and consider adjusting the fuel mixture or seeking further professional assistance if necessary.

Cleaning the spark plug

If you determine that the spark plug is dirty but still in good condition, cleaning it can help restore optimal performance. Here’s how to clean the spark plug effectively:

Use a wire brush

Start by using a wire brush to carefully scrub away any carbon deposits or other contaminants from the spark plug. Gently brush the electrode, insulator, and the threaded portion of the plug to remove any built-up residue. Be thorough but gentle to avoid damaging the spark plug.

Avoid using abrasive material

It’s important to note that using abrasive material, such as sandpaper or a metal pick, can damage the electrode or insulator. Stick to a soft-bristled wire brush to minimize the risk of causing any harm while cleaning.

Clean the electrode and insulator

Pay particular attention to the electrode and insulator, as these are the areas that directly affect the spark plug’s performance. Cleaning off any carbon deposits or other contaminants will improve the spark plug’s efficiency and reliability.

Reinstalling the spark plug

After the spark plug is clean, it’s time to reinstall it in the snowblower’s engine. Follow these steps to ensure proper installation:

Apply anti-seize compound

Before reinstalling the spark plug, apply a small amount of anti-seize compound to the threads. This will help prevent the spark plug from seizing or becoming difficult to remove in the future.

Hand tighten the spark plug

Using your fingers, carefully thread the spark plug back into the engine. Start by turning it clockwise to ensure it is properly aligned with the threads. Once it is threaded in snugly, use a socket wrench or spark plug socket to hand tighten the spark plug. Be careful not to overtighten, as this can damage the spark plug or the engine.

Reconnect the spark plug wire

Finally, reconnect the spark plug wire by sliding the boot or connector back onto the spark plug until it clicks into place. Make sure it is securely attached to prevent any loose connections that could affect the spark plug’s performance.

Testing the spark plug

After completing the cleaning and reinstallation process, it’s important to test the spark plug to ensure it is working correctly. Here are two tests you can conduct:

Check for spark

With the spark plug wire reconnected, position the spark plug near a grounded metal surface, such as the engine block. Pull the starter cord or engage the electric starter to cranking the engine while observing the spark plug. If you see a strong, blue spark jumping across the electrodes, it indicates that the spark plug is functioning properly.

Conduct spark plug resistance test

If you suspect that the spark plug may still be faulty even after cleaning, you can perform a spark plug resistance test using a multimeter. Set the multimeter to the resistance or ohms mode and attach the leads to the metal terminal and the threaded portion of the spark plug. If the multimeter displays a resistance reading within the manufacturer’s specifications, the spark plug is likely in good condition. If not, it may be time to consider replacing the spark plug.

Maintaining the spark plug

Regular maintenance is crucial to ensuring the longevity and optimal performance of the spark plug. Here are some key maintenance tips:

Regular cleaning schedule

Make it a habit to clean the spark plug on a regular basis, especially if you frequently use your snowblower or notice any signs of fouling or carbon deposits. A routine cleaning schedule will help prevent any buildup and ensure consistent performance.

Using fuel additives

Fuel additives, such as fuel stabilizers or cleaners, can also help maintain the cleanliness of your spark plug. These additives can help remove deposits and prevent carbon buildup, resulting in a cleaner and more efficient spark plug.

Replacing the spark plug

Despite regular cleaning and maintenance, spark plugs do have a limited lifespan. If you notice that the spark plug is wearing out, damaged, or not performing optimally even after cleaning, it may be time to replace it. Consult your snowblower’s manual or a professional technician for guidance on selecting the right spark plug for your specific engine model.

Common spark plug problems

Understanding common spark plug problems can help you identify issues and take appropriate action. Here are a few problems you may encounter:

Fouling

Spark plug fouling occurs when carbon deposits build up on the electrode, insulator, or both. This can happen due to a rich fuel mixture, oil burning issues, or excessive idling. Fouling can lead to starting difficulties, poor engine performance, and even misfires. Regular cleaning and adjusting the fuel mixture can help prevent and address fouling issues.

Carbon deposits

Carbon deposits can accumulate on the spark plug over time, especially if the fuel-air mixture is not properly balanced. These deposits can interfere with the spark plug’s ability to generate a strong spark, resulting in reduced engine performance and starting issues. Cleaning the spark plug regularly can help minimize carbon deposits and maintain optimal performance.

Worn electrodes

Over time, the electrode on the spark plug can wear down or erode, affecting its ability to generate a strong spark. Symptoms of worn electrodes include misfires, reduced engine performance, and difficulty starting the snowblower. If the electrode is significantly worn or damaged, it’s recommended to replace the spark plug to restore optimal performance.

Conclusion

Cleaning the spark plug in your snowblower is a simple yet important maintenance task that can greatly benefit the performance and longevity of your machine. By following the proper steps outlined in this article and maintaining a regular cleaning schedule, you can ensure that your snowblower’s spark plug continues to deliver that strong, reliable spark necessary for smooth operation. Keep in mind the importance of proper preparation, thorough inspection, and appropriate cleaning techniques to maximize the effectiveness of your spark plug maintenance routine.

How Do I Clean A Clogged Snowblower Chute?

So, you’re in the middle of winter and your trusty snowblower suddenly decides to play games with you by getting its chute all clogged up. Frustrating, right? But don’t worry, because in this article, we’re going to show you exactly how to tackle this snow-covered obstacle. From the tools you’ll need to the step-by-step process, we’ve got you covered. Say goodbye to those snowy blockages and get ready to have your snowblower running smoothly again in no time!

How Do I Clean A Clogged Snowblower Chute?

1. Safety Measures

When it comes to cleaning a clogged snowblower chute, safety should be your top priority. Snowblowers can be powerful and potentially dangerous machines, so taking the necessary precautions is essential to prevent accidents and injuries.

1.1 Wear Protective Gear

Before you start cleaning the clogged chute, make sure to wear the appropriate protective gear. This includes safety goggles or glasses to protect your eyes from flying debris, gloves to keep your hands safe from sharp edges or moving parts, and sturdy footwear to protect your feet.

1.2 Turn off the Snowblower

To ensure your safety, always turn off the snowblower and disconnect it from any power source before attempting to clean the clogged chute. This will prevent the machine from accidentally starting up while you are working on it, reducing the risk of injuries.

1.3 Disconnect the Spark Plug

For an extra layer of safety, disconnecting the spark plug is highly recommended. This will completely cut off the power supply to the snowblower, eliminating any possibility of it starting accidentally. Remember to consult your snowblower’s manual for specific instructions on how to disconnect the spark plug.

2. Diagnostic Step

Before diving into the cleaning process, it’s important to identify the source of the clog in your snowblower. By doing so, you can pinpoint the exact area that needs attention and troubleshoot accordingly.

2.1 Identify the Source of Clog

Take a close look at your snowblower to determine where the clog is occurring. It could be in the chute, impeller, auger, or somewhere else. By identifying the source of the clog, you can save time and effort by focusing your cleaning efforts on that specific area.

2.2 Inspect the Chute

Start by inspecting the chute, which is the part of the snowblower through which the snow is thrown. Check for any visible obstructions or blockages, such as rocks, ice chunks, or debris. If you can see a buildup of snow, it’s likely that the clog is located in the chute.

2.3 Check the Impeller

Next, examine the impeller, which is responsible for propelling the snow through the chute. Look for any objects that may be caught in the impeller, such as branches or large pieces of ice. If the impeller is obstructed, it can cause a blockage in the chute and prevent the snow from being properly ejected.

2.4 Examine the Auger

Another area to inspect is the auger, which is the part of the snowblower that scoops up the snow from the ground. Inspect the auger blades for any signs of clogging, such as packed snow or ice. If the auger is not able to rotate freely, it can contribute to the clogging issue.

How Do I Clean A Clogged Snowblower Chute?

3. Necessary Tools

In order to effectively clean a clogged snowblower chute, you’ll need a few tools on hand. These tools will help you remove the clog and ensure a smooth cleaning process.

3.1 Snow Shovel

A snow shovel will come in handy to remove any excess snow around the clogged chute. This will make it easier to access and clean the affected area of the snowblower.

3.2 Ice Scraper

An ice scraper can be useful for breaking up any ice or hard-packed snow that may be causing the clog. It will help loosen the debris, making it easier to remove from the chute.

3.3 Stiff Bristle Brush

A stiff bristle brush can be used to clean the chute and other parts of the snowblower. It will help remove any remaining debris or snow that may be stuck in hard-to-reach areas.

3.4 Screwdriver

A screwdriver may be required to remove certain panels or covers on the snowblower, allowing you to access the clogged chute more easily. Make sure to use the appropriate size and type of screwdriver for your specific snowblower model.

3.5 Pliers

Pliers can be helpful for removing any stubborn or hard-to-reach debris from the chute. They provide extra gripping power and allow you to maneuver around tight spaces.

3.6 Wrench

Depending on your snowblower model, a wrench may be needed to loosen and remove any bolts or screws that are securing the chute or other components. Make sure to have the correct size of wrench to avoid damaging the fasteners.

4. Step-by-Step Cleaning Process

Now that you have taken all the necessary safety precautions and gathered the required tools, it’s time to move on to the step-by-step cleaning process. Follow these instructions to effectively clean a clogged snowblower chute.

4.1 Remove Excess Snow

Using a snow shovel, clear away any excess snow or debris from the area around the clogged chute. This will make it easier to access and clean the affected area of the snowblower.

4.2 Disengage the Auger

Before starting any cleaning, make sure to disengage the auger. This will prevent the blades from spinning while you are working on the chute, reducing the risk of injuries.

4.3 Clear the Chute Opening

Using a snow shovel or your hands, carefully remove any visible obstructions or blockages from the chute opening. Make sure to clear the entire length of the chute to ensure optimal snowblower performance.

4.4 Remove the Clog from the Auger Housing

If the clog is located in the auger housing, use a screwdriver or wrench to remove any necessary panels or covers. Once you have access to the auger housing, carefully remove the clog by hand or with the help of pliers. Be cautious of any sharp edges or rotating parts.

4.5 Check and Clean the Discharge Chute

Inspect the discharge chute for any remaining debris or snow. Use a stiff bristle brush to clean the inside of the chute and remove any stubborn clogs. Make sure the discharge chute is clear and unobstructed to ensure proper snowblower operation.

4.6 Reassemble the Snowblower

Once the chute is clear and all debris has been removed, replace any panels or covers that were removed. Ensure that all fasteners are tightened securely. Double-check that the auger is disengaged and the spark plug is reconnected before starting the snowblower again.

5. Preventative Maintenance

Cleaning a clogged snowblower chute is just one part of proper snowblower maintenance. To keep your snowblower in optimal condition and prevent future clogs, follow these preventative maintenance tips.

5.1 Clear Snow Before it Accumulates

Try to clear snow regularly as it falls instead of waiting for it to accumulate. This will prevent excessive buildup and reduce the chance of clogs in the chute or other parts of the snowblower.

5.2 Regularly Lubricate Moving Parts

Keep the moving parts of your snowblower well-lubricated to ensure smooth and efficient operation. Consult your snowblower’s manual for the recommended lubrication points and frequency.

5.3 Inspect and Replace Worn Components

Regularly inspect all components of your snowblower for any signs of wear or damage. Replace any worn or damaged parts promptly to prevent further issues and ensure the longevity of your snowblower.

5.4 Store the Snowblower Properly

When the winter season is over, properly store your snowblower to avoid any damage or performance issues. Clean the machine thoroughly, remove any remaining fuel, and store it in a dry and covered area to protect it from the elements.

6. Troubleshooting

Despite following all the necessary steps and taking preventative measures, you may encounter some issues with your snowblower. Here are some common troubleshooting tips for addressing potential problems.

6.1 Clog continues to occur

If you find that clogs persist even after thoroughly cleaning the chute, there may be an underlying issue with your snowblower. It could be a problem with the auger, impeller, or other components. Consider consulting a professional for further assistance and diagnosis.

6.2 Auger not rotating

If the auger is not rotating as it should, check for any obstructions or debris that may be causing a blockage. Clear any clogs and ensure the auger is disengaged before attempting to troubleshoot any electrical or mechanical issues.

6.3 Reduced throwing distance

If you notice a decrease in the throwing distance of the snowblower, it could indicate a clog or a problem with the impeller. Clean the chute, impeller, and any other areas that may be obstructed. If the issue persists, consult a professional for further evaluation.

6.4 Snow chute gets clogged quickly

If the snow chute gets clogged quickly after cleaning, make sure you are clearing the chute opening completely during the cleaning process. Additionally, check the auger blades for any signs of damage or wear. Replace worn blades and regularly maintain the snowblower to prevent further clogging issues.

How To Clean Your Snow Blowers Before Storage?

Are you ready to bid farewell to the snowy season and safely store away your trusty snow blower until next winter? Before you do, it’s important to give your snow blower a thorough cleaning to ensure it stays in top-notch condition. Cleaning your snow blower before storage not only helps prevent rust and corrosion, but it also extends the lifespan of this invaluable winter tool. In this article, you’ll discover a step-by-step guide on how to properly clean your snow blower, so it’s ready for action when the snowflakes start falling once again.

How To Clean Your Snow Blowers Before Storage?

This image is property of terre-products.com.

Preparing Your Snow Blower for Storage

As the winter season comes to an end, it’s time to start thinking about storing your snow blower until next year. But before you tuck it away, it’s important to properly clean and prepare your snow blower for storage. By following a few simple steps, you can ensure that your snow blower remains in good condition and is ready for use when the snow starts falling again. In this article, we’ll guide you through the process of preparing your snow blower for storage, covering everything from disconnecting the spark plug to storing it in a dry and secure location.

Disconnecting the Spark Plug

One of the first Steps in preparing your snow blower for storage is to disconnect the spark plug. This is an important safety precaution that will prevent the engine from accidentally starting during the storage period. To disconnect the spark plug, follow these simple steps:

Step 1: Locate the spark plug

The spark plug is typically located on the side or top of the engine. It is a small, cylindrical object with a wire attached to it.

Step 2: Disconnect the spark plug wire

Once you have located the spark plug, simply pull off the wire connected to it. This will break the electrical connection and prevent the engine from starting. It’s important to note that you should never disconnect the spark plug while the engine is running or when the snow blower is still hot.

Emptying the Fuel Tank

Before storing your snow blower, it’s crucial to empty the fuel tank. Stale fuel can cause damage to the engine and make it difficult to start the snow blower when you need it next. Here’s how you can empty the fuel tank:

Step 1: Run the snow blower until it runs out of fuel

Start the snow blower and let it run until it runs out of fuel. This ensures that there is no fuel remaining in the tank or the fuel lines.

Step 2: Invert the snow blower to drain any remaining fuel

Once the snow blower has run out of fuel, tilt it on its side or invert it to drain any remaining fuel from the tank. You can use a fuel siphon or simply wait for the fuel to drain out naturally.

Step 3: Dispose of the old fuel properly

It’s important to dispose of the old fuel properly and not simply pour it down the drain or into the soil. Check with your local waste management facility for the proper disposal methods for fuel in your area. In some cases, they may have specific guidelines or collection points for disposing of hazardous materials.

Checking and Changing the Oil

To keep your snow blower running smoothly, it’s essential to check and change the oil regularly. Before storing your snow blower, it’s a good idea to change the oil to ensure that it is fresh and clean. Here’s how you can do it:

Step 1: Locate the oil drain plug or dipstick

The oil drain plug or dipstick is usually located on the bottom or side of the engine. Refer to your snow blower’s manual to locate it.

Step 2: Drain the old oil

Place a pan or container under the oil drain plug and remove the plug to drain the old oil. Make sure to dispose of the old oil properly.

Step 3: Refill with fresh oil

Replace the oil drain plug and refill the engine with fresh oil. Consult your snow blower’s manual for the recommended type and amount of oil.

Step 4: Dispose of the old oil properly

Just like with the fuel, it’s important to dispose of the old oil properly. Many auto parts stores or service stations have oil recycling programs, so you can drop off the used oil there for proper disposal.

How To Clean Your Snow Blowers Before Storage?

This image is property of www.guardianstorage.com.

Cleaning the Exterior

Cleaning the exterior of your snow blower is important to remove any dirt, debris, or salt residue that may have accumulated during use. Here’s how you can do it:

Step 1: Remove any debris from the snow blower

Start by removing any loose debris, such as leaves or twigs, from the surface and components of the snow blower. You can use a brush or your hands to do this.

Step 2: Use a mild detergent and water to clean the surfaces

Mix a small amount of mild detergent with water and use a sponge or soft cloth to gently clean the surfaces of the snow blower. Pay special attention to areas that are more prone to dirt buildup, such as the handlebars and control panel.

Step 3: Dry thoroughly before storage

After cleaning, make sure to dry the snow blower thoroughly before storing it. Use a clean cloth or allow it to air dry for some time. Moisture can lead to rust or damage to certain components, so it’s crucial to store the snow blower when it’s completely dry.

Cleaning the Chute and Auger Housing

The chute and auger housing are key components of your snow blower that require regular cleaning to ensure proper functioning. Here’s how you can clean them:

Step 1: Disconnect the spark plug for safety

As a safety precaution, always disconnect the spark plug before performing any maintenance or cleaning tasks on your snow blower.

Step 2: Use a brush to remove any caked-on snow or debris

Using a stiff brush, carefully scrape away any caked-on snow or debris from the chute and auger housing. Pay attention to hard-to-reach areas and corners.

Step 3: Wipe down with a clean cloth

After brushing off the snow and debris, use a clean cloth to wipe down the chute and auger housing. This will help remove any remaining dirt or residue.

Step 4: Lubricate the chute and auger for smooth operation

To ensure smooth operation, apply a light coat of lubricant to the chute and auger. This will help prevent rust and allow for easy snow discharge during use.

How To Clean Your Snow Blowers Before Storage?

This image is property of www.absolutemgmt.com.

Inspecting and Replacing the Belts

Belts are an important part of your Snow blower’s functionality and should be inspected regularly for wear and tear. Here’s how you can check and replace the belts, if necessary:

Step 1: Locate the belts on the snow blower

Refer to your snow blower’s manual to locate the belts. They are usually found near the engine or transmission.

Step 2: Check for any signs of wear or damage

Inspect the belts for signs of wear, cracks, or fraying. If you notice any damage, it’s important to replace the belts before storing the snow blower.

Step 3: Replace any worn or damaged belts

If you find that one or more belts are worn or damaged, it’s best to replace them before storing the snow blower. Refer to your snow blower’s manual or consult a professional if you are unsure how to replace the belts yourself.

Cleaning the Carburetor

The carburetor is responsible for mixing air and fuel to create the necessary combustion in your snow blower’s engine. Cleaning the carburetor is vital to ensure proper functioning. Here’s how you can clean the carburetor:

Step 1: Remove the air filter cover

Start by removing the air filter cover to access the carburetor. This cover is usually located near the top or side of the engine.

Step 2: Remove the air filter and clean it

Take out the air filter and clean it according to the manufacturer’s instructions. If the air filter is damaged or excessively dirty, it’s best to replace it with a new one.

Step 3: Remove the carburetor bowl and clean it

Next, remove the carburetor bowl by unscrewing the bolts or screws that hold it in place. Carefully clean the bowl using a carburetor cleaner or a brush to remove any dirt or debris.

Step 4: Reassemble the carburetor

After cleaning the carburetor bowl, carefully reassemble the carburetor by following the reverse order of the disassembly process. Make sure all the components are securely attached and in the correct positions.

How To Clean Your Snow Blowers Before Storage?

This image is property of www.snowblowersdirect.com.

Removing and Cleaning the Spark Arrestor

The spark arrestor is an important safety component in your snow blower that helps prevent sparks from igniting surrounding flammable materials. Cleaning it regularly will ensure its proper functioning. Here’s how you can remove and clean the spark arrestor:

Step 1: Locate the spark arrestor

The spark arrestor is typically located near the exhaust outlet of the snow blower’s engine. Refer to your snow blower’s manual to locate it.

Step 2: Remove the spark arrestor

Detach the spark arrestor by unscrewing or unclamping it from the engine. Make sure to handle it carefully as it can be hot.

Step 3: Clean the spark arrestor with a wire brush

Using a wire brush, gently scrub the spark arrestor to remove any carbon buildup or debris. Take care not to damage the screen or any other components.

Checking the Skid Shoes and Scraper Blade

The skid shoes and scraper blade are crucial for maintaining the proper clearance between the snow blower and the ground, as well as protecting surfaces from damage. Here’s how you can check them:

Step 1: Inspect the skid shoes

Check the condition of the skid shoes, which are located on the sides of the auger housing. If they are worn or damaged, replace them before storing the snow blower.

Step 2: Examine the scraper blade

Inspect the scraper blade, located at the bottom of the auger housing. Look for signs of wear or damage. If the scraper blade is worn down, it’s best to replace it to ensure efficient snow removal.

How To Clean Your Snow Blowers Before Storage?

This image is property of www.snowblowersdirect.com.

Storing the Snow Blower in a Dry and Secure Location

Now that you have completed all the necessary maintenance and cleaning tasks, it’s time to store your snow blower in a dry and secure location. Follow these steps for proper storage:

Step 1: Choose a dry and secure storage location

Find a place to store the snow blower where it will be protected from moisture, extreme temperatures, and potential damage. Ideally, this would be a garage, shed, or any covered area.

Step 2: Cover the snow blower with a protective tarp or cover

To keep your snow blower clean and dust-free during storage, cover it with a protective tarp or cover. This will also help prevent any accidental damage from falling objects.

Step 3: Store the snow blower in an upright position

Finally, store the snow blower in an upright position. This helps prevent any fuel or oil from leaking onto other parts of the snow blower and reduces the risk of damage to the machine.

By following these steps and properly preparing your snow blower for storage, you can ensure that it remains in good condition and is ready for use when the next snowstorm hits. Taking the time to disconnect the spark plug, empty the fuel tank, clean the exterior, inspect and replace any worn parts, and store it in a dry and secure location will extend the life of your snow blower and save you from headaches when winter returns. Stay prepared, stay safe, and enjoy a hassle-free snow season!

How Many Cc’s Should A Snowblower Have?

Winter is upon us and with it comes the daunting task of clearing our driveways and walkways from snow. The question on everyone’s minds is, “How many cc’s should a snowblower have?” We all want a snowblower that is powerful enough to tackle any amount of snow that comes our way, but is there a magic number when it comes to cubic centimeters? In this article, we will explore the different factors to consider when choosing the right cc for your snowblower, so you can make an informed decision and conquer winter with ease.

Snowblower Engine Basics

When it comes to choosing a snowblower, understanding the basics of the engine is crucial. One important factor to consider is the engine cc, or cubic centimeter, which refers to the size of the engine’s combustion chamber. The engine cc is indicative of the power output of the snowblower and plays a significant role in its performance.

What is an engine cc?

Engine cc refers to the volume of the engine’s cylinders, specifically the total displacement of all the cylinders in the engine. In general, a higher engine cc indicates a larger and more powerful engine.

Understanding engine power

Engine power is measured in horsepower (HP) and is a measure of the engine’s output. A higher horsepower generally means a more powerful snowblower, capable of handling heavy snow and tough conditions more effectively.

The relationship between engine size and power

The size of the engine, or engine cc, directly affects the power output of the snowblower. A larger engine with higher cc will typically produce more power, allowing the snowblower to plow through deeper and denser snow with ease. However, it’s important to find the right balance between engine size and power for your specific needs.

Factors to Consider

Before choosing a snowblower, there are several factors to consider that can help determine the ideal engine cc for your needs.

Snow depth and density

The amount and density of snow in your area greatly impact the engine power required. If you usually experience light snowfalls, a lower cc snowblower may be sufficient. However, if you often encounter heavy, wet snow, a higher cc snowblower would be more suitable for the task.

Driveway or walkway size

The size of the area you need to clear also influences the engine cc you should consider. Smaller driveways or walkways may not require as much power, while larger areas will benefit from a snowblower with a higher engine cc.

Terrain and slope

Consider the terrain and slope of your property. If you have steep slopes or uneven terrain, a more powerful snowblower will provide the necessary traction and control to navigate such conditions effectively.

Frequency of use

How often you plan to use the snowblower is another crucial factor to consider. If you live in an area with frequent snowfalls, a higher cc snowblower will ensure efficient and reliable performance throughout the winter season.

Other features

In addition to engine cc, there are other features to consider when choosing a snowblower, such as electric start, self-propelled capabilities, and adjustable chute and deflector. These features can enhance usability and convenience, and should also be taken into account when determining the ideal engine cc for your needs.

How Many Ccs Should A Snowblower Have?

This image is property of anestwithayard.com.

CC Recommendations for Residential Use

For residential use, snowfall depth is typically the primary determining factor when selecting the appropriate engine cc.

Light duty (up to 18 inches of snow)

For light-duty residential use, typically experiencing snow depths of up to 18 inches, a snowblower with an engine cc ranging from 200cc to 350cc should suffice.

Medium duty (18-24 inches of snow)

Medium-duty snowfalls, ranging from 18 to 24 inches, will require a snowblower with an engine cc of approximately 350cc to 500cc. This range of engine cc will provide the necessary power to effectively handle snow of this depth.

Heavy duty (24+ inches of snow)

In areas prone to heavy snowfall, with depths exceeding 24 inches, a snowblower with an engine cc of 500cc or higher is recommended. This level of power is necessary to tackle the challenges posed by deep and dense snow.

CC Recommendations for Commercial Use

Commercial-grade snowblowers are designed to handle more demanding tasks and require higher engine cc to accommodate the increased workload.

Light-duty commercial

For light-duty commercial use, such as small businesses or light commercial areas, snowblowers with engine cc ranging from 500cc to 800cc should be sufficient.

Medium-duty commercial

Medium-duty commercial snowblowers, suitable for larger commercial areas or properties, typically have an engine cc of 800cc to 1000cc. These snowblowers can handle heavier snowfalls and more frequent use.

Heavy-duty commercial

Heavy-duty commercial use, such as clearing large parking lots or heavy snowfall areas, requires snowblowers with engine cc exceeding 1000cc. These powerful snowblowers can handle the most demanding snow-removal tasks.

How Many Ccs Should A Snowblower Have?

This image is property of www.cubcadet.ca.

Considering Four-Stroke vs Two-Stroke Engines

In addition to engine cc, another consideration when choosing a snowblower is whether to opt for a four-stroke or two-stroke engine. Both engine types have their own advantages and considerations.

Different fuel requirements

A key distinction between four-stroke and two-stroke engines is their fuel requirements. Four-stroke engines typically run on regular gasoline, while two-stroke engines require a specific oil-gasoline mixture.

Emissions and environmental impact

Four-stroke engines tend to be more environmentally friendly, emitting fewer pollutants compared to two-stroke engines. This consideration might be important if you prefer a cleaner and greener option.

Noise levels

Two-stroke engines are known to produce more noise compared to their four-stroke counterparts. If noise levels are a concern, a snowblower with a four-stroke engine might be more suitable.

Maintenance and ease of use

Four-stroke engines generally require less maintenance compared to two-stroke engines. They also tend to be easier to start and operate, making them a convenient choice for many users.

Choosing the Right Brand

When investing in a snowblower, it’s essential to choose a reputable and reliable brand. Consider the following factors when selecting a brand:

Researching reliable brands

Take the time to research and identify well-established brands known for producing high-quality snowblowers. Look for brands that have a reputation for durability and performance.

Customer reviews and ratings

Read customer reviews and ratings to gain insights into the experiences of other users. This will help you gauge the reliability and satisfaction levels associated with a particular brand.

Warranty and customer support

Check for warranty options and the availability of customer support when researching different brands. A solid warranty and accessible customer support can provide peace of mind in case any issues arise.

Price range

Consider your budget when choosing a snowblower brand. Compare prices and features across different brands to ensure you get the best value for your money.

How Many Ccs Should A Snowblower Have?

This image is property of images.thdstatic.com.

Understanding Additional Features

When selecting a snowblower, it’s important to understand and consider the additional features it offers. These features can add convenience and enhance the overall snow-clearing experience.

Electric start

Snowblowers with electric start eliminate the need for manual pulling to start the engine. This feature is especially useful in cold weather conditions.

Self-propelled

A self-propelled snowblower reduces the effort required to maneuver and push the equipment. This feature is beneficial when dealing with heavy snow or larger areas.

Single-stage vs two-stage

Single-stage snowblowers are generally lighter and more compact, making them suitable for smaller areas. Two-stage snowblowers, on the other hand, are designed to handle heavier snowfalls and provide greater power and throwing distance.

Adjustable chute and deflector

Having an adjustable chute and deflector allows you to control the direction and distance at which the snow is thrown. This feature adds flexibility and precision to your snow-clearing efforts.

Heated handle grips

Some snowblowers come equipped with heated handle grips, providing additional comfort when operating the equipment in cold weather.

Headlight

A built-in headlight can be a useful feature, especially if you often find yourself clearing snow during early morning or late evening hours when visibility is limited.

Maintenance and Care

To ensure the longevity and optimal performance of your snowblower, regular maintenance and care are essential. Here are some key areas to focus on:

Checking oil levels

Regularly check the oil levels in your snowblower and change the oil as recommended by the manufacturer. This ensures proper lubrication of the engine and prevents damage.

Spark plug maintenance

Inspect and clean the spark plug regularly to ensure it is functioning properly. A fouled or damaged spark plug can affect the starting and performance of your snowblower.

Fuel system care

Use clean and fresh gasoline, following the manufacturer’s recommendations. Consider using fuel stabilizer to prevent fuel deterioration during periods of non-use.

Cleaning and storage

After each use, clean your snowblower thoroughly, removing any debris or snow buildup. Properly store your snowblower in a dry and protected area to prevent rust or damage from moisture.

How Many Ccs Should A Snowblower Have?

This image is property of img.hobbyfarms.com.

Consulting with Experts

If you are unsure about the engine cc and other factors that should influence your snowblower choice, it can be helpful to consult with experts in the field.

Talking to knowledgeable salespersons

Visit local retailers or dealerships and talk to salespersons who specialize in snowblowers. They can provide valuable insights and recommendations based on your specific needs and circumstances.

Seeking advice from professionals

If you have a large or complex property that requires expert advice, consider consulting with professional snow removal services. They can assess your needs and make recommendations based on their experience and expertise.

Online forums and communities

Participating in online forums and communities focused on snowblowers can also be beneficial. Engage with other users and enthusiasts to gather insights, tips, and recommendations.

Conclusion

Choosing the right snowblower engine cc is essential for efficient snow removal, whether it’s for residential or commercial use. Factors such as snow depth, driveway size, and specific needs should guide your decision. Consider additional features, maintenance requirements, and consult with experts to make an informed choice. With the right snowblower and engine cc, you can confidently tackle any winter storm. Stay warm and keep that driveway clear!

How Many Ccs Should A Snowblower Have?

This image is property of anestwithayard.com.