How Can I Upgrade My Snowblower’s Air Filter?

So you’ve got a snowblower and you’ve recently started noticing that it’s not performing as well as it used to. Well, one potential culprit could be a clogged or outdated air filter. A snowblower’s air filter is a crucial component in ensuring optimal performance and preventing debris from entering the engine. In this article, we will explore the steps you can take to upgrade your snowblower’s air filter, allowing it to breathe easier and tackle those winter woes with renewed efficiency.

How Can I Upgrade My Snowblowers Air Filter?

Why upgrade your snowblower’s air filter?

When it comes to maintaining your snowblower, upgrading your air filter is an often overlooked but important task. The air filter plays a crucial role in protecting your snowblower’s engine from harmful debris and ensuring optimal performance. Upgrading your air filter can improve engine performance, extend its life, and even save you money on fuel and maintenance costs. In this article, we will discuss the different types of air filters, signs that your air filter needs upgrading, how to choose the right air filter upgrade, and tips for maintaining and maximizing its performance.

Types of air filters

There are several types of air filters available for snowblowers, each with their own advantages and considerations. Here are some of the most common types:

Foam air filters

Foam air filters are made of a fine, porous material that effectively captures dirt and debris from entering the engine. They are known for their excellent filtration capabilities, especially for finer particles. Foam air filters are often washable and reusable, making them a cost-effective option in the long run. However, it’s important to avoid over-oiling foam filters, as excess oil can restrict airflow and lead to reduced engine performance.
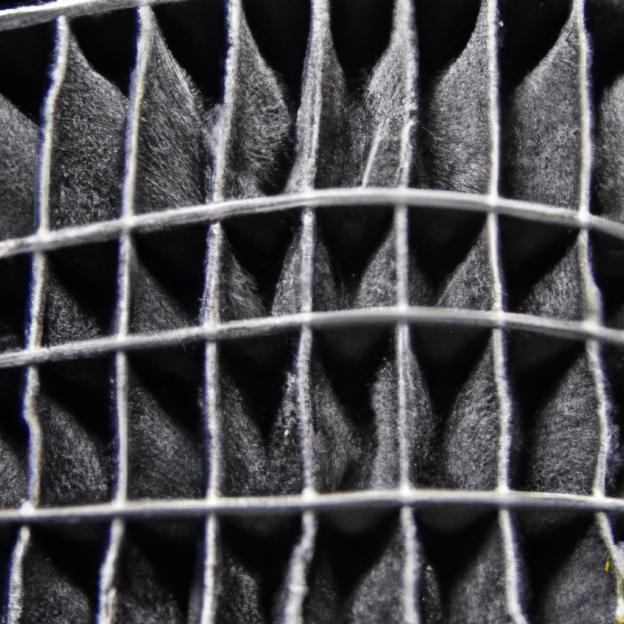
Paper air filters

Paper air filters are made of a pleated paper material that effectively traps larger particles and debris from entering the engine. They offer good filtration efficiency and are often replaceable, ensuring convenient maintenance. Paper air filters are generally easy to install and provide reliable protection for your snowblower’s engine.

Mesh air filters

Mesh air filters, also known as wire mesh filters, are made of a fine metal mesh material that filters out larger particles while allowing sufficient airflow. They are durable and can withstand heavy use and harsh outdoor conditions. Mesh air filters are often washable and reusable, making them a cost-effective option in the long run. However, they may not provide the same level of filtration efficiency as foam or paper filters.

Cotton air filters

Cotton air filters, also known as gauze filters, are constructed with layers of cotton fabric and an oil coating that captures and holds particles. They offer excellent filtration efficiency and can improve engine performance by allowing better airflow. Cotton air filters are often washable and reusable, making them environmentally friendly and cost-effective. However, they require regular maintenance and careful oiling to ensure optimal performance.

Signs that your air filter needs upgrading

Understanding when to upgrade your snowblower’s air filter is essential for maintaining its performance and protecting the engine. Here are some common signs that indicate your air filter may need an upgrade:

Restricted airflow

If you notice a decrease in the airflow coming from your snowblower’s engine, it may be a sign that the air filter is clogged or worn out. Restricted airflow can significantly impact engine performance and efficiency, making it important to upgrade your air filter promptly.

Reduced engine performance

A snowblower that is struggling to start, experiencing power fluctuations, or producing unusual noises may be a result of a dirty or inadequate air filter. When the air filter becomes clogged, it can restrict the amount of air entering the engine, leading to reduced performance and potential damage in the long run. Upgrading your air filter can help restore your snowblower’s engine to its optimal performance.

Excessive fuel consumption

If you find that your snowblower is consuming more fuel than usual, it could be a sign that the air filter is not effectively filtering out dirt and debris. A clogged or inefficient air filter can cause the engine to work harder, resulting in increased fuel consumption. Upgrading to a more efficient air filter can improve fuel efficiency and save you money in the long term.

How Can I Upgrade My Snowblowers Air Filter?

Choosing the right air filter upgrade

When it comes to choosing the right air filter upgrade for your snowblower, there are a few factors to consider. These factors will help ensure compatibility, filtration efficiency, and ease of maintenance. Here are some key considerations:

Consider your snowblower model

Different snowblower models may require specific air filter types or sizes. It’s important to consult your snowblower’s manual or manufacturer to determine the recommended air filter specifications. By choosing the right air filter that is designed for your specific snowblower model, you can ensure optimal performance and compatibility.

Evaluate filtration efficiency

Filtration efficiency refers to how well the air filter captures and retains dirt and debris. A higher filtration efficiency ensures better protection for your snowblower’s engine. Consider the type of debris commonly encountered in your snowblowing environment and choose an air filter that can effectively filter those particles. Foam and paper filters generally offer higher filtration efficiency, while mesh and cotton filters may have slightly lower efficiency but still provide adequate protection.

Check maintenance requirements

Different air filters have varying maintenance requirements. Some filters are washable and reusable, while others require replacement after a certain period. Consider your preference and convenience when it comes to maintenance tasks. Keep in mind that proper maintenance is crucial for optimal air filter performance, so choose a filter that aligns with your ability and commitment to regular maintenance.

How to upgrade your snowblower’s air filter

Now that you have chosen the right air filter upgrade for your snowblower, here are the steps to properly upgrade the air filter:

Research compatibility options

Before making a purchase, ensure that the new air filter is compatible with your snowblower model. Refer to your snowblower’s manual or consult the manufacturer to determine the correct filter size and type. Research reputable brands and read customer reviews to ensure the filter’s reliability and performance.

Remove the old air filter

To remove the old air filter, consult your snowblower’s manual for specific instructions. In general, you may need to open the air filter housing or remove a cover to access the filter. Carefully remove the old filter, taking note of its orientation and any clips or fasteners that may be holding it in place.

Install the new air filter

Take the new air filter and ensure it matches the specifications and orientation of the old filter. Insert the new filter into the air filter housing, paying attention to any notches or alignment guides. Press the filter firmly against the housing to ensure a proper seal.

Secure the air filter housing

Once the new filter is properly installed, close the air filter housing or replace the cover according to your snowblower’s instructions. Make sure any clips or fasteners are securely tightened to prevent any air leaks.

Maintaining your upgraded air filter

After upgrading your snowblower’s air filter, proper maintenance is crucial for ensuring its long-term performance. Here are some tips for maintaining your upgraded air filter:

Regular cleaning

If your air filter is washable and reusable, it’s important to clean it regularly. Follow the manufacturer’s instructions for cleaning, which may involve using a mild detergent or a specific cleaning solution. Gently rinse the filter with water and allow it to fully dry before reinstallation. Regular cleaning helps remove accumulated debris and keeps the filter functioning at its best.

Replacement intervals

For air filters that require replacement, it’s important to follow the manufacturer’s recommended replacement intervals. Over time, even the most efficient air filters will become less effective due to clogging and wear. Regularly inspect the condition of the filter and replace it when necessary to maintain optimal engine performance and protection.

Storing your snowblower for the offseason

When storing your snowblower for the offseason, it’s important to properly prepare and protect not only the machine but also the air filter. Clean the air filter thoroughly and ensure it is completely dry before storing. Consider covering the air filter housing with a breathable material to prevent dust and debris from entering during storage.

Additional tips for maximizing air filter performance

To further maximize the performance of your snowblower’s air filter, consider the following tips:

Avoid over-oiling foam filters

If you are using a foam air filter, be cautious not to over-oil it. Excess oil can restrict airflow and negatively impact engine performance. Follow the manufacturer’s instructions for oiling the filter, ensuring a thin and even coating.

Inspect for cracks or tears

Regularly inspect your air filter for any signs of damage such as cracks or tears. Damaged filters can allow debris to bypass the filtration system and enter the engine, causing potential damage. If you notice any damage, promptly replace the air filter to maintain optimal protection.

Protect the air filter from moisture

Excess moisture can damage the air filter and reduce its effectiveness. When operating your snowblower in wet or snowy conditions, take measures to protect the air filter from direct exposure to moisture. Consider using a rain cover or a shield to prevent water from directly contacting the filter.

Avoid operating your snowblower in dusty conditions

Dust and fine particles can quickly accumulate in the air filter, clogging it and reducing performance. Whenever possible, avoid operating your snowblower in excessively dusty conditions. If unavoidable, consider upgrading to an air filter with higher filtration efficiency or clean the filter more frequently.

Benefits of upgrading your snowblower’s air filter

Upgrading your snowblower’s air filter offers a range of benefits that are worth considering. Here are some advantages of upgrading:

Improved engine performance

A clean and efficient air filter allows for better airflow, resulting in improved engine performance. Upgrading to an air filter with higher filtration efficiency can prevent dirt and debris from reaching the engine, reducing power loss and improving overall performance.

Extended engine life

By upgrading your air filter, you can protect your snowblower’s engine from harmful contaminants. Clean air is essential for engine longevity, as it reduces wear and tear on internal components. An upgraded air filter can help extend the life of your snowblower’s engine, saving you money on costly repairs or replacements.

Cost savings on fuel and maintenance

Upgrading to a more efficient air filter can improve fuel efficiency by minimizing engine strain and reducing fuel consumption. In addition, properly maintaining and replacing the air filter at regular intervals can prevent engine damage and expensive repairs. By investing in a quality air filter, you can potentially save money on fuel and maintenance costs in the long run.

Conclusion

Upgrading your snowblower’s air filter is a simple yet effective way to improve engine performance, prolong engine life, and save money on fuel and maintenance. Consider the different types of air filters available, signs that indicate an air filter upgrade is needed, and factors to consider when choosing the right air filter. Follow the proper steps to upgrade and maintain your air filter, and maximize its performance by avoiding over-oiling foam filters, inspecting for damage, protecting the filter from moisture, and avoiding dusty conditions. Upgrade your air filter today and experience the benefits it can bring to your snowblower. Stay proactive in maintaining your snowblower’s air filter, and your snowblower will reward you with reliable and efficient performance for many winters to come.

What’s The Role Of The Choke In Starting A Snowblower?

So you’ve got your snowblower ready to tackle that mountain of snow in your driveway, but you’re not quite sure what to do with that choke. You may have heard about it before, but you’re not exactly sure what its role is in getting your snowblower up and running. Well, fear not, because we’re here to break it down for you. The choke actually plays a crucial role in starting a snowblower, as it helps to regulate the flow of air and fuel into the engine. By adjusting the choke, you can control the air-to-fuel ratio, ensuring a smooth and efficient start. So, let’s take a closer look at why the choke is an essential component when it comes to firing up your snowblower.

Whats The Role Of The Choke In Starting A Snowblower?

This image is property of pixabay.com.

Understanding the Choke

What is a choke?

A choke is a device that controls the air-to-fuel mixture in the carburetor of a snowblower’s engine. It restricts the airflow to the engine, allowing for a richer fuel mixture to be delivered during the starting process. This is necessary because an excessively lean fuel mixture can make starting the engine difficult, especially in cold weather.

How does a choke work?

When the choke is engaged, it closes off the air intake, reducing the amount of air entering the carburetor. This creates a vacuum effect, causing more fuel to be drawn into the combustion chamber. With a higher concentration of fuel, the engine is able to start more easily. As the engine warms up, the choke gradually opens, allowing more air to enter and restoring the proper air-to-fuel ratio for efficient combustion.

Why is a choke necessary for starting a snowblower?

A choke is necessary for starting a snowblower because cold weather can affect the fuel’s ability to evaporate. In low temperatures, fuel tends to condense, making it difficult to vaporize and ignite in the combustion chamber. By enriching the air-fuel mixture with the help of the choke, the snowblower’s engine gets the added fuel it needs to start and overcome the challenges posed by cold weather.

Effects of Choke Positions

Full choke position

The full choke position completely closes off the air intake, limiting the airflow to the minimum. This results in maximum fuel concentration in the mixture, making it easier to start the engine in extremely cold weather conditions. However, it’s important to remember that using the full choke position for an extended period can lead to a rich fuel mixture, which may cause the engine to bog down or run poorly.

Partial choke position

The partial choke position allows for some airflow to enter the carburetor while still restricting it to some extent. It provides a moderately rich air-fuel mixture, making it suitable for starting the snowblower in mildly cold conditions. The partial choke position strikes a balance between fuel enrichment and maintaining proper engine performance, gradually transitioning the snowblower to regular operation.

No choke position

The no choke position, as the name suggests, opens the air intake completely, allowing for normal airflow into the carburetor. This position is used after the engine has warmed up and stabilized to operating temperature. Once the engine is running smoothly, it is important to switch off the choke to prevent an overly rich fuel mixture, which can lead to poor engine performance and higher fuel consumption.

Whats The Role Of The Choke In Starting A Snowblower?

This image is property of pixabay.com.

Starting Process

Step 1: Verify safety precautions

Before starting the snowblower, it’s important to ensure proper safety precautions. This includes checking for any loose or damaged parts, ensuring the snowblower is on a flat and stable surface, and making sure there are no obstacles in the surrounding area that could cause harm or damage.

Step 2: Set the choke position

Depending on the temperature and starting conditions, set the choke to the appropriate position. In colder temperatures, the full choke position is typically recommended, while the partial choke position may be suitable for milder conditions.

Step 3: Prime the engine

Priming the engine involves delivering a small amount of fuel directly into the carburetor to aid in cold starts. Follow the manufacturer’s instructions to properly prime the engine, which may involve pressing a primer bulb a specific number of times or using a separate priming mechanism.

Step 4: Engage the ignition system

Once the choke is set and the engine is primed, engage the ignition system. This typically involves turning the ignition key to the “start” position or pulling the starter cord. Be sure to follow the manufacturer’s instructions for starting the specific snowblower model.

Step 5: Adjust choke gradually

As the engine starts to run, adjust the choke gradually to allow more air into the carburetor and regulate the air-to-fuel mixture. This prevents the engine from running too rich and ensures optimal performance. Once the engine has warmed up and stabilized, switch off the choke and the snowblower should be ready for operation.

Common Choke-Related Issues

Choke plate obstruction

One common issue is when the choke plate becomes obstructed or stuck due to dirt, debris, or gummed-up fuel. This can prevent the choke from properly engaging or disengaging, leading to difficulties in starting and running the engine. Regular cleaning and maintenance of the choke assembly can help prevent choke plate obstructions.

Choke stuck in a position

Sometimes, the choke can become stuck in a particular position, usually due to corrosion or mechanical issues. This can prevent the choke from being adjusted or switched off, causing the engine to run too rich or lean. A thorough inspection and potential repair or replacement of the choke mechanism may be necessary if it becomes stuck.

Choke not working properly

If the choke is not working properly, it may not provide the necessary fuel enrichment during starting, making it difficult to start the snowblower. This can be due to a faulty choke assembly, damaged choke plate, or other underlying issues. Troubleshooting the choke system, such as cleaning or repairing it, can help resolve the problem.

Choke cable damage

The choke cable connects the choke lever or control knob to the choke assembly, allowing for easy adjustment of the choke position. If the choke cable becomes damaged, frayed, or disconnected, it can impede proper choke operation. Regular inspection of the choke cable and addressing any signs of damage can prevent choke-related issues.

Whats The Role Of The Choke In Starting A Snowblower?

This image is property of pixabay.com.

Maintenance and Troubleshooting

Cleaning the choke assembly

Regularly cleaning the choke assembly is essential for continued proper operation. Remove any dirt, debris, or fuel residue that may have accumulated on the choke plate or inside the carburetor. Using a carburetor cleaner or a small brush can help remove any stubborn build-up. Ensure all components are dry before reassembling.

Inspecting the choke cable

Inspect the choke cable for any signs of damage, such as fraying, corrosion, or loose connections. If any issues are identified, it may be necessary to replace the choke cable. Lubricating the choke cable periodically can help maintain its smooth operation.

Repairing or replacing the choke

If the choke plate, choke assembly, or other choke-related components are damaged or malfunctioning, it may be necessary to repair or replace these parts. Consult the snowblower’s manual or seek assistance from a professional technician to properly address any choke-related issues.

Seeking professional assistance

If troubleshooting and basic maintenance do not resolve choke-related problems, seeking professional assistance is recommended. A qualified technician can diagnose and repair any underlying issues or provide guidance on proper choke maintenance.

Alternative Starting Methods

Using an electric starter

Some snowblowers are equipped with an electric starter, which eliminates the need for manual choke operation. Simply plug in the electric starter, press the start button, and the starter motor will crank the engine to begin the ignition process. This method can be especially convenient for individuals who may have difficulty with manual starting procedures.

Using a primer bulb

Another alternative starting method is using a primer bulb. The primer bulb is typically located on the carburetor and allows for manual fuel priming. By pressing the primer bulb a few times, fuel is forced into the carburetor, aiding in cold starts. This method can be effective in reducing the reliance on the traditional choke system.

Warming up the engine without choke

In certain weather conditions, such as when the engine is already warm or during mild temperatures, it may be possible to start the snowblower without using the choke. This can be done by following the manufacturer’s recommended starting procedure without engaging the choke. However, it’s important to note that using the choke during cold starts is still generally recommended for optimal performance and reliability.

Whats The Role Of The Choke In Starting A Snowblower?

Importance of Choke Control

Ensuring smooth engine operation

Proper choke control plays a crucial role in ensuring smooth engine operation, especially during cold starts. By enriching the air-fuel mixture with the choke, the engine receives the necessary fuel supply to ignite and run smoothly. This helps prevent stalling, sputtering, or other performance issues that can arise from a lean fuel mixture.

Preventing damage to the engine

Using the choke when starting a snowblower helps prevent damage to the engine components. Without the choke, the engine may experience a lean fuel condition, leading to increased heat and potential damage to the piston, cylinder walls, or other internal parts. The choke provides the necessary enriching effect to protect the engine during the starting process.

Optimizing fuel efficiency

Proper choke control optimizes fuel efficiency by ensuring the correct air-to-fuel ratio for combustion. Using the choke in the starting process allows for a richer fuel mixture to be delivered, compensating for the lower evaporative ability of fuel in cold weather. Once the engine warms up and reaches operating temperature, switching off the choke prevents excessive fuel consumption and promotes efficient fuel utilization.

Difference in Choke Design

Manual choke vs. automatic choke

Manual chokes require the user to manually adjust the choke position using a lever, knob, or other control mechanism. This allows for more precise control over the air-to-fuel ratio, especially for individuals who are familiar with their snowblower’s starting requirements. Automatic chokes, on the other hand, adjust the choke position automatically based on the engine’s temperature, requiring less user intervention.

Cable-operated choke vs. lever-operated choke

A cable-operated choke is controlled by a cable that connects to the choke lever or control knob. This allows for remote control of the choke position, providing convenience and ease of adjustment. Lever-operated chokes, on the other hand, have the choke control lever located directly on the carburetor, requiring manual operation in close proximity to the engine.

Older choke systems vs. newer choke systems

Older choke systems may rely on mechanical linkages and manual adjustments. They tend to be more prone to issues such as sticking, corrosion, or wear and tear. Newer choke systems often incorporate more advanced technologies, such as automatic chokes or electronic choke controls, which can improve reliability and ease of operation.

Whats The Role Of The Choke In Starting A Snowblower?

Understanding the Snowblower Engine

Why is a choke required for small engines?

Small engines, such as those found in snowblowers, rely on a precise air-to-fuel mixture for proper combustion. Due to their small size and limited air intake capabilities, they are more sensitive to changes in the ambient temperature and fuel evaporation rates. By using the choke, which enriches the air-fuel mixture, small engines are better equipped to start and run smoothly, especially during cold weather.

How does the choke affect the air-to-fuel ratio?

The choke affects the air-to-fuel ratio by increasing the fuel concentration in the mixture during the starting process. By limiting the intake of air, the choke creates a richer mixture that is easier to ignite in colder temperatures. As the engine warms up, the choke gradually opens, allowing more air to enter and ultimately restoring the proper air-to-fuel ratio for efficient combustion.

Importance of proper air-to-fuel mixture

Maintaining the proper air-to-fuel mixture is crucial for the overall performance and longevity of the snowblower’s engine. A lean mixture, caused by inadequate fuel supply, can result in engine overheating, increased wear on internal components, and poor performance. Conversely, an excessively rich mixture can lead to fouled spark plugs, carbon deposits, and decreased fuel efficiency. The choke helps ensure that the engine receives the appropriate fuel supply for reliable and efficient operation.

Choke Usage in Different Weather Conditions

Cold weather and choke operation

In cold weather, the choke operation becomes particularly important. Cold temperatures hinder fuel evaporation and make starting the engine more challenging. It is recommended to use the full choke position in extremely cold conditions to provide the necessary fuel enrichment for successful starts. Gradually adjusting the choke as the engine warms up helps maintain optimal performance.

Warm weather and choke requirements

In warm weather, the need for choke enrichment is reduced. The fuel evaporation rates are higher, and the engine can typically start more easily without the full choke. In such conditions, starting the engine with the choke in the partial choke position or no choke position may be sufficient to achieve smooth starts and operation.

Humid weather and choke adjustments

Humid weather can affect the density of the air, potentially requiring adjustments to the choke position during the starting process. The level of fuel enrichment needed may vary depending on the humidity level. It’s important to monitor the engine’s performance and adjust the choke as necessary to ensure proper starting and optimal air-to-fuel mixture.

How Do I Repair A Punctured Snowblower Tire?

So, you’re out there, ready to tackle that massive snowfall with your trusty snowblower, when suddenly you hear a loud hissing sound. You know what that means – a punctured tire. Don’t panic just yet. In this article, we’ll walk you through the simple steps on how to repair a punctured snowblower tire, so you can get back to clearing that snow without skipping a beat. Whether you’re a seasoned snowblower pro or a first-timer, we’ve got you covered. Let’s get that tire fixed and get back to conquering that winter wonderland!

How Do I Repair A Punctured Snowblower Tire?

Inspecting

When you discover a puncture in your snowblower tire, the first step is to inspect the tire thoroughly. This will help you determine the severity of the damage and the appropriate repair method to use. Inspecting involves removing the tire, checking for any punctures, and identifying the cause of the puncture.

Removing the tire

To remove the tire, begin by lifting the snowblower off the ground or securing it on a stable surface. Look for the axle bolt or pin that holds the tire in place and remove it using the appropriate tools. Gently pull the tire off the axle, taking care not to damage the surrounding components.

Checking for punctures

Once the tire is removed, carefully examine the entire surface for any punctures. This can be done visually by inspecting the tread and sidewalls for any visible damage. Additionally, you can use soapy water and a brush to create suds over the tire. Look for any bubbling, which indicates air escaping from a puncture.

Identifying the cause

After locating a puncture, it is essential to identify the cause of the damage. Common causes include sharp objects such as nails, screws, or shards of glass. By understanding the cause, you can take preventative measures to avoid future punctures.

Repair Options

Once you have inspected the punctured snowblower tire, you can explore different repair options. The suitable method will depend on the size and location of the puncture.

Using a patch kit

A patch kit is a cost-effective solution that can effectively repair small to medium-sized punctures. It typically includes a piece of rubber patch and rubber cement. The patch adheres to the interior of the tire, sealing the puncture.

Applying tire sealant

Tire sealant is another option for repairing a punctured snowblower tire. It is a liquid or gel-like substance that can be injected into the tire to seal the puncture. As the tire rotates, the sealant spreads over the puncture, sealing it from the inside.

Using a tire plug

A tire plug is a straightforward and quick repair method suitable for small punctures. It involves inserting a plug into the puncture to seal it. Tire plugs are often made of a rubber-like material, and they provide temporary or permanent repairs, depending on the plug used.

Preparing for Repair

Before starting the repair process, it’s crucial to gather the necessary tools, clean the tire, and deflate it properly.

Gathering necessary tools

To repair a punctured snowblower tire, you will need a few tools. These typically include tire levers, a patch kit or tire sealant, pliers to remove the valve core, and a tire pressure gauge. Having these tools readily available will make the repair process smoother and more efficient.

Cleaning the tire

Before applying any repair method, it’s essential to clean the area around the puncture. Use a brush and soapy water to remove any dirt, debris, or snow that may be present. Cleaning the tire ensures proper adhesion and maximizes the effectiveness of the repair.

Deflating the tire

To prepare the tire for repair, you’ll need to deflate it. Use a tire pressure gauge to check the current pressure, and then use a valve stem tool or pliers to remove the valve core. This will allow the air to escape, making it easier to apply the repair method of your choice.

How Do I Repair A Punctured Snowblower Tire?

Repair Method 1: Using a Patch Kit

Using a patch kit is a reliable and cost-effective method for repairing punctured snowblower tires. It involves locating the puncture, applying rubber cement, and placing the patch.

Locating the puncture

After preparing the tire by cleaning and deflating it, locate the puncture visually or by using soapy water. Once the puncture is identified, mark its location using a colored chalk or any other suitable marker. This will make it easier to apply the patch accurately.

Applying rubber cement

The next step is to apply rubber cement to the punctured area. Using the patch kit, squeeze a small amount of rubber cement onto the puncture. Spread the cement evenly, making sure to cover the entire area around the puncture. Allow the rubber cement to dry for a few minutes until it becomes tacky.

Placing the patch

Once the rubber cement is tacky, take the rubber patch from the patch kit and apply it to the puncture. Press firmly on the patch to ensure it adheres securely to the tire. Smooth out any air bubbles or wrinkles, and allow the patch to fully bond with the tire according to the instructions provided with the patch kit.

Repair Method 2: Applying Tire Sealant

Using tire sealant is a popular method for repairing punctured snowblower tires, especially for small punctures. The process involves shaking the sealant bottle, removing the valve core, and injecting the sealant.

Shaking the sealant bottle

Before using tire sealant, shake the bottle vigorously to ensure proper mixing of the liquid or gel inside. This helps to activate its sealing properties and ensures optimum effectiveness.

Removing the valve core

To inject the tire sealant into the punctured snowblower tire, you’ll need to remove the valve core. Use pliers or a valve stem tool to unscrew the valve core in a counterclockwise direction. Take care not to lose the valve core, as you will need to replace it later.

Injecting the sealant

With the valve core removed, position the nozzle or tube of the sealant bottle over the valve stem. Squeeze the bottle to inject the sealant into the tire. The sealant will spread throughout the tire, sealing the puncture from the inside. Make sure to follow the manufacturer’s instructions regarding the amount of sealant to use.

Repair Method 3: Using a Tire Plug

Using a tire plug is a simple and quick method to repair small punctures in snowblower tires. This method involves preparing the plug, inserting it into the puncture, and trimming any excess plug.

Preparing the plug

Start by preparing the tire plug according to the instructions provided with the plug kit. Typically, this involves threading the plug through an insertion tool or lubricating it for easier insertion. Ensure that the plug is ready to use before proceeding.

Inserting the plug

With the punctured area cleaned and the tire deflated, insert the prepared plug into the puncture. Push the plug in until only a small portion remains visible on the tire surface. Make sure the plug is securely lodged inside the tire, effectively sealing the puncture.

Trimming excess plug

After the plug is inserted into the tire, use a sharp knife or scissors to trim any excess plug sticking out from the tire’s surface. Ensuring the plug is flush with the tire’s tread or sidewall will minimize any potential damage and maintain the tire’s overall integrity.

Reinstalling the Tire

Once the repair is complete, it’s time to reinstall the snowblower tire. This process involves inflating the tire, checking for leaks, and replacing the valve core.

Inflating the tire

Using a suitable air compressor or tire pump, inflate the repaired tire to the recommended pressure specified by the manufacturer. It’s essential to verify the correct pressure, as over or under inflation can affect the tire’s performance and longevity.

Checking for leaks

After inflating the tire, visually inspect the repaired area for any signs of leaks. Additionally, you can use soapy water and a brush to create suds over the previously punctured area. Look for any bubbling, indicating air escaping from the repaired puncture. If any leaks are found, it may be necessary to repeat the repair process or explore alternative repair methods.

Replacing the valve core

Ensure that there are no leaks and the repaired area is securely sealed before proceeding to replace the valve core. Insert the valve core back into the valve stem and use pliers or a valve stem tool to tighten it in a clockwise direction. This will ensure proper inflation and prevent air from escaping.

Final Checks

Before using the snowblower with the repaired tire, it’s crucial to perform a series of final checks to ensure everything is in proper working order.

Testing the tire

To test the repaired tire, inflate it to the recommended pressure and carefully inspect it visually for any signs of bulges, deformities, or other abnormalities. Additionally, take the snowblower for a short test run to assess the tire’s performance and stability.

Inspecting for proper seal

Ensure that the repair method has effectively sealed the puncture by checking for any air leaks. Monitor the repaired area closely for an extended period to ensure there are no signs of air escaping or any other potential issues.

Ensuring proper inflation

Verify that the tire is properly inflated according to the manufacturer’s recommendations. Adequate tire pressure is essential for optimal performance and safety, especially in challenging snowblowing conditions. Regularly check the tire pressure to maintain proper inflation levels.

Preventive Measures

While repairing a punctured snowblower tire is essential, taking preventive measures to avoid future punctures is equally important.

Avoiding sharp objects

Be cautious when operating the snowblower in areas where sharp objects, such as nails, screws, or shards of glass, may be present. Clear the area before snowblowing to minimize the risk of puncturing your tire.

Proper tire maintenance

Regularly maintain your snowblower tires by inspecting them for signs of wear, uneven tread, or any other damage. Replace tires when necessary to ensure optimum performance and prevent unnecessary punctures.

Regularly checking for leaks

By regularly inspecting your snowblower tires for leaks, you can identify and address any potential punctures promptly. Monitoring tire pressure and conducting visual inspections after each use will help you catch punctures early and prevent further damage.

Conclusion

Repairing a punctured snowblower tire is a crucial skill that every snowblower owner should possess. By carefully inspecting the tire, identifying the cause, and using the appropriate repair method, you can effectively fix punctures and extend the lifespan of your tires. Whether using a patch kit, tire sealant, or a tire plug, proper preparation and installation are essential to ensure a successful repair. Additionally, implementing preventive measures, such as avoiding sharp objects and regularly maintaining your tires, will minimize the risk of future punctures. With the knowledge and techniques outlined in this article, you can confidently repair punctured snowblower tires and enjoy uninterrupted snowblowing during the winter season.

Are There Any Ultralight Snowblowers For Easy Transport?

If you’ve ever experienced the hassle of lugging around a heavy snowblower, you may be wondering if there are any ultralight options available for easier transportation. The answer is, fortunately, yes! In this article, we’ll explore the world of ultralight snowblowers and uncover their innovative features that make them a convenient choice for those looking to effortlessly clear snow without breaking their backs.

Are There Any Ultralight Snowblowers For Easy Transport?

Types of Snowblowers

When it comes to snowblowers, there are several different types to choose from. The three main categories are single-stage, two-stage, and three-stage snowblowers. Each type has its own unique features and advantages, so let’s take a closer look at each one.

Single-Stage Snowblowers

Single-stage snowblowers are the most basic and compact option available. They are typically smaller and lighter than the other types, making them easier to maneuver and transport. These snowblowers use a single rotating auger to both gather and throw the snow. While they are effective for clearing light to moderate amounts of snow, they may struggle with heavy, wet snow or deep snowdrifts. However, if you have a smaller driveway or walkway and don’t typically deal with heavy snowfall, a single-stage snowblower may be a suitable choice for you.

Two-Stage Snowblowers

Two-stage snowblowers are larger and more powerful than single-stage models. They feature an additional impeller located behind the auger, which helps to propel the snow out through the chute. This two-stage process allows for greater throwing distance and clearing capacity, making them well-suited for larger areas and heavier snowfalls. Two-stage snowblowers also tend to have wider clearing widths, enabling you to clear a wider path with each pass. If you live in an area with moderate to heavy snowfall or have a larger driveway to clear, a two-stage snowblower could be the right choice for you.

Three-Stage Snowblowers

Three-stage snowblowers are the most powerful and heavy-duty option available. They have an additional accelerator that assists in breaking up icy snow and pushing it into the impeller for maximum throwing distance. This three-stage process allows for even more efficient snow clearing, especially in areas with heavy and wet snow. These snowblowers are typically larger and heavier, making them better suited for commercial use or for individuals with large properties that accumulate significant amounts of snow. If you frequently deal with heavy and compacted snow or have a large area to clear, a three-stage snowblower might be the best choice for you.

Standard Weight Snowblowers

Before diving into the world of ultralight snowblowers, let’s first take a moment to consider the features and benefits of standard weight snowblowers. Standard weight snowblowers, also known as mid-size snowblowers, strike a balance between size, power, and maneuverability. They are designed to be sturdy and durable while still being manageable to handle.

Features of Standard Weight Snowblowers

Standard weight snowblowers typically have clearing widths ranging from 20 to 28 inches, allowing you to clear a substantial amount of snow in each pass. They are often equipped with powerful engines, ranging from 200cc to 300cc, providing enough power to handle most snow conditions. These snowblowers also come with adjustable skid shoes, allowing you to easily adapt to different surface types and depths of snow. Additionally, many standard weight snowblowers offer features such as electric start, heated handle grips, and headlights, making your snow-clearing experience more convenient and comfortable.

Benefits of Standard Weight Snowblowers

One of the main benefits of standard weight snowblowers is their versatility. They are suitable for a wide range of snow conditions and can handle both light dustings and heavy snowfall. Their manageable size and weight make them easy to maneuver, allowing you to navigate around obstacles and clear tight spaces. Standard weight snowblowers are also more affordable compared to larger and more specialized models, making them a popular choice for homeowners looking for a reliable snow-clearing solution without breaking the bank.

Ultralight Snowblowers

Now let’s shift our focus to ultralight snowblowers, which are specifically designed for easy transport and maneuverability. These snowblowers are lightweight and compact, making them an excellent choice for individuals who need to transport their snowblower frequently or have limited storage space.

Definition of Ultralight Snowblowers

Ultralight snowblowers are the lightest and most portable option available on the market. They are typically smaller in size, weighing between 30 and 60 pounds. The compact design of ultralight snowblowers allows for easy transportation and storage, whether it be loading it into a vehicle for transportation or stowing it away in a garage or shed. Despite their smaller size, ultralight snowblowers are still powerful enough to handle light to moderate snow conditions.

Advantages of Ultralight Snowblowers

One of the obvious advantages of ultralight snowblowers is their portability. Their lightweight nature allows for easy lifting and loading, making them a convenient choice for those who may need to transport their snowblower to multiple locations. Ultralight snowblowers are also easier to maneuver, making them ideal for clearing narrow walkways, decks, and sidewalks. Additionally, their compact size makes storage a breeze, especially for individuals with limited space. Whether you have a small driveway or don’t typically experience heavy snowfall, an ultralight snowblower could be the perfect solution for your snow-clearing needs.

Are There Any Ultralight Snowblowers For Easy Transport?

Considerations for Easy Transport

When looking for a snowblower that is easy to transport, there are several key factors to consider. By keeping these considerations in mind, you can ensure that your snowblower is not only lightweight but also practical for your specific needs.

Weight

The weight of the snowblower is crucial when it comes to transportability. As mentioned earlier, ultralight snowblowers typically weigh between 30 and 60 pounds, which makes them much easier to lift and handle. It’s important to assess how comfortable you are with lifting and carrying different weight ranges and choose a snowblower that aligns with your physical capabilities.

Size and Dimensions

In addition to weight, size and dimensions play a significant role in the ease of transport. A compact snowblower will be easier to maneuver and store. Be sure to consider the overall dimensions, including the length, width, and height, to ensure that the snowblower will fit in your vehicle or storage area without any difficulty.

Handle Options

The handle design of a snowblower can greatly impact its ease of transport. Look for models that offer collapsible or folding handles, as they can significantly reduce the overall size of the snowblower when it comes time to transport or store it. Some snowblowers also have handles that can be adjusted to different heights, allowing for increased comfort and control during operation.

Wheels or Tires

Another consideration for easy transport is the type of wheels or tires on the snowblower. Look for models with large, sturdy wheels or tires that can easily navigate different terrains. Pneumatic tires provide additional traction and shock absorption, making them ideal for uneven surfaces or rough terrain. Consider the terrain in your area and choose a snowblower with wheels or tires that can handle it with ease.

Top Ultralight Snowblowers

If you’re in the market for an ultralight snowblower, here are three top brands that offer reliable and efficient options:

Brand A Ultralight Snowblower

Brand A has gained a reputation for manufacturing high-quality snowblowers that are not only lightweight but also powerful. Their ultralight snowblowers are equipped with efficient engines that ensure consistent performance. Additionally, Brand A focuses on ergonomic designs, providing comfortable handles and intuitive controls. Their ultralight snowblowers are known for their ease of use and excellent maneuverability, making them a top choice for individuals in need of easy transportation.

Brand B Ultralight Snowblower

Brand B specializes in producing compact and lightweight snowblowers that are perfect for easy transport. Their ultralight models are known for their exceptional clearing capacity and durability. Brand B prioritizes user-friendly features and designs, ensuring that their snowblowers are accessible to users of all experience levels. With a Brand B ultralight snowblower, you can enjoy both efficient snow clearing and effortless transport.

Brand C Ultralight Snowblower

Brand C is a trusted name in the industry, renowned for its commitment to producing top-of-the-line snowblowers. Their ultralight models are no exception, offering exceptional performance and easy transportability. Brand C emphasizes advanced technology and innovation in their designs, resulting in snowblowers that are both efficient and user-friendly. With a Brand C ultralight snowblower, you can tackle snow removal with ease and have confidence in the reliability of your machine.

Features to Look for in Ultralight Snowblowers

Now that you have an idea of some top brands offering ultralight snowblowers, it’s time to consider the specific features you should look for when making your selection. These features will help ensure that your chosen ultralight snowblower meets your snow-clearing needs effectively and efficiently.

Power Source

Ultralight snowblowers can be powered by either electricity or gas. Electric models are generally lighter and quieter, but they require access to a power outlet or extension cord. On the other hand, gas-powered snowblowers provide more mobility but require regular maintenance and the availability of gasoline. Consider your preferences and the availability of power sources when deciding which type of ultralight snowblower is best for you.

Clearing Width

The clearing width refers to the width of the path that the snowblower can clear in a single pass. Ultralight snowblowers typically have clearing widths ranging from 12 to 18 inches. A wider clearing width allows you to clear more snow with each pass, reducing the overall time and effort required to clear your desired area. However, keep in mind that a wider clearing width may also result in a heavier snowblower, so find the right balance based on your needs and physical capabilities.

Throwing Distance

The throwing distance is the distance at which the snowblower can throw the cleared snow. Ultralight snowblowers typically have throwing distances ranging from 10 to 20 feet. Consider the size of your property and where you want the snow to be deposited. If you have a large area to clear or need the snow to be thrown a significant distance, opt for a snowblower with a longer throwing distance.

Speed Settings

Some ultralight snowblowers offer multiple speed settings, allowing you to adjust the speed based on the snow conditions and your preferred pace. Having different speed options can help you maintain control and efficiency while clearing snow, especially when dealing with varying depths or densities of snow. Consider whether this feature is important to you and choose a snowblower with suitable speed settings.

Auger Type

The auger is the rotating mechanism that gathers the snow and feeds it into the impeller for throwing. Ultralight snowblowers can have either plastic or metal augers. Plastic augers are generally lighter, quieter, and less likely to damage surfaces, making them ideal for clearing delicate areas like decks or paved walkways. On the other hand, metal augers are more durable and better equipped for heavy and compacted snow. Consider the type of snow you typically encounter and choose an auger type that suits your needs best.

Clearing Depth

The clearing depth refers to the maximum depth of snow that the snowblower can effectively handle. Ultralight snowblowers typically have clearing depths ranging from 6 to 12 inches. Consider the typical snowfall levels in your area and opt for a snowblower with a clearing depth that can handle the snow conditions you’re likely to face. Keep in mind that trying to clear snow that exceeds the clearing depth of your snowblower may result in reduced performance or potential damage to the machine.

Chute Control

Chute control allows you to adjust the direction and angle at which the snow is thrown. Some ultralight snowblowers have manual chute control, which requires you to manually adjust the chute direction by hand. Others may offer remote chute control, allowing you to adjust the chute direction without needing to stop and manually make the adjustments. Consider whether the convenience and ease of remote chute control are important to you, or if you’re comfortable manually adjusting the chute as needed.

Pros and Cons of Ultralight Snowblowers

Like any product, ultralight snowblowers have their own set of pros and cons that you should consider before making a purchase. Understanding these advantages and disadvantages will help you make an informed decision and select the best snowblower for your needs.

Pros of Ultralight Snowblowers

  1. Portability: The lightweight and compact design of ultralight snowblowers make them highly portable and easy to transport.

  2. Maneuverability: Ultralight snowblowers are easier to maneuver in tight spaces and around obstacles, allowing for efficient snow clearing.

  3. Storage: The compact size of ultralight snowblowers makes them easy to store, particularly for individuals with limited storage space.

  4. Suitable for light to moderate snow conditions: Ultralight snowblowers are ideal for clearing lighter snowfall or smaller areas, making them a practical choice for many homeowners.

Cons of Ultralight Snowblowers

  1. Limited clearing capacity: Ultralight snowblowers may struggle with heavy or deep snow, requiring multiple passes to clear the desired area fully.

  2. Less power: Due to their smaller and lighter design, ultralight snowblowers may not offer the same power as larger models, potentially resulting in reduced performance in certain snow conditions.

  3. Limited throwing distance: The throwing distance of ultralight snowblowers may be shorter compared to larger models, which could impact the efficiency and coverage of your snow clearing.

Factors to Consider Before Buying

Before purchasing an ultralight snowblower, it’s important to assess specific factors that may influence your decision. By considering these factors, you can ensure that the snowblower you choose is well-suited to your specific needs and preferences.

Climate Conditions

Consider the typical climate conditions in your area, particularly the frequency and intensity of snowfall. If you live in an area that experiences heavy and frequent snowfall, an ultralight snowblower may not be the best option. However, if you deal with lighter snow conditions or have a smaller area to clear, an ultralight snowblower can be an effective and efficient choice.

Snow Volume

Assess the amount of snow you typically need to clear. Ultralight snowblowers are better suited for light to moderate snowfall and smaller areas. If you frequently face heavy or deep snow, you may want to consider a heavier-duty snowblower that can handle larger volumes of snow more efficiently.

Terrain

The terrain of your property can impact how well an ultralight snowblower performs. If you have a flat and even surface, an ultralight snowblower will generally be sufficient. However, if your property has slopes, rough terrain, or uneven surfaces, you may need to consider a snowblower with more robust features and capabilities.

Budget

I’m sure you’re also considering your budget when shopping for an ultralight snowblower. Ultralight snowblowers are generally more affordable compared to larger and more specialized models. That being said, prices can still vary depending on the brand, features, and overall quality. Set a budget that aligns with your needs and research different models within that range to find the best value for your money.

Maintenance and Care

To ensure the longevity and optimal performance of your ultralight snowblower, it’s crucial to follow proper maintenance and care practices. By taking care of your snowblower, you’ll not only extend its lifespan but also ensure that it’s always ready to tackle the next snowfall.

Cleaning the Snowblower

After each use, take the time to thoroughly clean your snowblower. Remove any built-up snow or ice from the auger, chute, and other parts. Use a brush or scraper to remove any debris or residue that may have accumulated. Be sure to refer to the manufacturer’s instructions for specific cleaning recommendations to prevent damage to the machine.

Inspecting and Replacing Parts

Regularly inspect your ultralight snowblower for any signs of wear or damage. Pay special attention to the auger, belts, skid shoes, and other essential components. Replace any worn or damaged parts promptly to prevent further damage and ensure optimal performance. It’s also a good idea to have spare parts on hand, such as shear pins and belts, in case they need to be replaced during the snowy season.

Storage Tips

When storing your ultralight snowblower, take a few precautions to protect it from the elements and ensure its proper functioning when needed. Clean the snowblower thoroughly before storage to remove any dirt or debris. Consider using fuel stabilizer if you have a gas-powered model to prevent fuel deterioration. Store the snowblower in a dry and sheltered area, away from extreme temperatures and moisture. Cover the snowblower properly to keep dust and debris out.

Conclusion

In conclusion, ultralight snowblowers are an excellent choice for individuals looking for easy transport and maneuverability. With their lightweight and compact design, ultralight snowblowers offer portability and convenience without compromising on effectiveness. Consider the specific features, advantages, and disadvantages of ultralight snowblowers to find the best fit for your snow-clearing needs. Whether it’s a small residential driveway or a compact city sidewalk, an ultralight snowblower can be an efficient and reliable companion during the snowy winter months. So, stay prepared and embrace the ease of snow clearing with an ultralight snowblower tailored to your requirements.

How Do I Fix A Snowblower With A Broken Ignition System?

So, you wake up on a snowy winter morning ready to tackle the task of clearing your driveway, only to find that your trusty snowblower isn’t starting. Frustration starts to set in as you realize that the ignition system might be the culprit. But fear not, because in this article, we’ll guide you through the steps to fix a snowblower with a broken ignition system, getting you back to tackling that snow in no time.

How Do I Fix A Snowblower With A Broken Ignition System?

Overview of Snowblower Ignition System

Snowblowers are commonly used during winter to clear snow from driveways and sidewalks. The ignition system of a snowblower is crucial for its proper functioning, as it is responsible for igniting the engine and getting it started. Understanding the function and diagnosing any issues with the ignition system is essential for maintaining and repairing your snowblower.

Understanding the Function of the Ignition System

The ignition system of a snowblower consists of several components that work together to start the engine. The main components include the spark plug, ignition switch, ignition coil, and starter motor. When you turn the ignition switch, it sends an electrical signal to the ignition coil, which generates high voltage. This high voltage is then transferred to the spark plug, creating a spark to ignite the fuel mixture in the engine. The starter motor is responsible for turning the engine’s flywheel to initiate the combustion process.

Common Signs of a Broken Ignition System

Identifying the signs of a broken ignition system in your snowblower is crucial for prompt repairs. Some common signs that indicate a problem with the ignition system include:

  1. Difficulty Starting: If your snowblower is difficult to start or doesn’t start at all, it may indicate an issue with the ignition system.

  2. No Spark: When you remove the spark plug and check for spark while pulling the starter cord, if you don’t see a spark, it suggests an ignition problem.

  3. Engine Stalling: If your snowblower starts but then stalls shortly afterward, it could be due to a faulty ignition system.

  4. Inconsistent Engine Performance: An ignition system issue can lead to sporadic engine performance, including rough idling or misfiring.

Diagnosing the Issue

Properly diagnosing the issue with your snowblower’s ignition system is crucial for effective repairs. Here are some steps you can take to diagnose the problem:

Checking for Spark

Begin by removing the spark plug and reconnecting it to the spark plug wire. Hold the spark plug against a metal surface on the engine and pull the starter cord. Check for a spark between the electrodes of the spark plug. If you don’t see a spark, it could indicate a problem with the ignition system.

Inspecting the Ignition Switch

The ignition switch is usually located on the control panel of the snowblower. Ensure that the ignition switch is properly connected and not damaged. Inspect the wiring for any loose connections or broken wires, as they can cause issues with the ignition system.

Examining the Starter Motor

If your snowblower’s starter motor is not functioning correctly, it can prevent the engine from starting. Check the starter motor for any signs of damage or wear. Ensure that it is properly connected and free from any debris or obstruction.

How Do I Fix A Snowblower With A Broken Ignition System?

Replacing the Ignition System

If you have determined that the ignition system needs to be replaced, here are the steps to follow:

Gathering the Necessary Tools and Parts

Before starting the replacement process, gather all the necessary tools and parts. These may include a socket wrench set, pliers, a replacement ignition system, and any other equipment specific to your snowblower model.

Disconnecting the Spark Plug

Ensure that the engine is cool, then disconnect the spark plug wire from the spark plug. This will prevent accidental starts during the replacement process.

Removing the Ignition Switch

Locate the ignition switch on the control panel and carefully disconnect any wiring or connectors attached to it. Remove any screws or fasteners holding the ignition switch in place. Take note of the positions of the wires and connectors as you will need to reconnect them later.

Installing the New Ignition System

Carefully install the new ignition system, following the reverse order of the removal steps. Ensure that all wires and connectors are properly attached according to the previous positions. Tighten any screws or fasteners securely.

Reconnecting the Spark Plug

Finally, reconnect the spark plug wire to the spark plug. Ensure a firm connection, but be careful not to overtighten. This will complete the replacement process of the ignition system.

Repairing the Ignition System

If the issue with your snowblower’s ignition system can be repaired rather than replaced, here are some steps you can take:

Cleaning and Testing the Spark Plug

Remove the spark plug and clean it using a wire brush or a spark plug cleaner. Inspect the spark plug for any signs of damage or wear. If necessary, replace the spark plug with a new one. Before reinstalling the spark plug, use a spark plug tester to ensure that it is producing a spark.

Repairing or Replacing the Ignition Coil

If the ignition coil is faulty, it may need to be repaired or replaced. Check the coil for any visible damage or signs of wear. If the coil is damaged, it will need to be replaced. If it is still in good condition, you can try cleaning the connections and inspecting the wiring for any issues.

Repairing or Replacing the Ignition Switch

If the ignition switch is causing the ignition system problem, you may need to repair or replace it. Inspect the switch for any damage or loose connections. If the switch is damaged or not functioning correctly, it will need to be replaced. For loose connections, ensure they are tightened securely.

Troubleshooting the Starter Motor

If the starter motor is not functioning correctly, troubleshooting may be necessary. Check for any obstructions or debris that may be preventing the motor from turning. Cleaning the motor and ensuring proper lubrication may resolve the issue. If the motor is damaged, it may need to be replaced.

Maintaining the Ignition System

Proper maintenance of the ignition system can prolong its lifespan and prevent costly repairs. Here are some maintenance tips for the ignition system of your snowblower:

Cleaning the Ignition Components

Regularly clean the spark plug, ignition coil, and ignition switch to remove any debris or buildup. Use a soft brush or compressed air to gently clean the components. Ensure that the spark plug electrode gap is within the manufacturer’s specifications.

Replacing the Spark Plug Regularly

It is advisable to replace the spark plug periodically, according to the manufacturer’s recommendations. Over time, spark plugs can become worn or fouled, leading to ignition system issues. Replace the spark plug with the recommended type and ensure proper installation.

Performing Routine Maintenance Checks

Regularly inspect the ignition system components for any signs of damage or wear. Check the wiring connections for tightness and repair any loose or damaged wires promptly. Lubricate the starter motor as recommended by the manufacturer to keep it operating smoothly.

Advisory: Seeking Professional Help

Repairing or replacing the ignition system of a snowblower can be complex, especially if you are not experienced in small engine repairs. Additionally, safety precautions must be taken when working with electrical components. It is advisable to seek professional help if you are unsure or uncomfortable performing these repairs yourself.

Complexity of Ignition System Repairs

The ignition system of a snowblower is a complex assembly of components that require proper knowledge and expertise to diagnose and repair. Mistakes during repairs can lead to further damage or even personal injury. Professional technicians have the necessary skills and tools to accurately resolve ignition system issues.

Safety Precautions

Working with electrical components carries inherent risks. Snowblowers with broken ignition systems may not start or shut off unexpectedly, posing safety hazards. Professional technicians are trained to handle these risks and take appropriate safety precautions.

Consulting a Professional Technician

If you are unsure or uncomfortable performing ignition system repairs yourself, it is best to consult a professional technician. They can accurately diagnose the issue and recommend the most suitable repair or replacement options. Additionally, they can ensure that all safety precautions are followed during the repair process.

Alternative Solutions

In some cases, alternative solutions may be viable for temporary use or as a workaround for a broken ignition system. These solutions include:

Using an External Starter

An external starter, such as a jump box or a battery pack, can be used to start the snowblower engine without relying on the ignition system. By connecting the external starter to the starter motor directly, you can bypass the ignition system temporarily.

Jump-Starting the Snowblower

If the ignition system issue is due to a weak or dead battery, jump-starting the snowblower may be possible. Use jumper cables and a separate power source, such as a car battery, to provide the necessary electrical current to start the engine.

Preventive Measures

To minimize the chances of facing ignition system issues with your snowblower, consider following these preventive measures:

Protecting the Snowblower from Moisture

Snow and moisture can cause damage to the ignition system and other electrical components of your snowblower. When not in use, store the snowblower in a dry and protected area, away from rain or extreme weather conditions. Use a cover to protect it from moisture and prevent rusting.

Storing the Snowblower Properly

During the off-season, it is important to store your snowblower properly. This includes draining the fuel system, cleaning the equipment, and storing it in a clean and dry location. Proper storage can prevent issues with the ignition system caused by stale fuel or debris accumulation.

Conclusion

The ignition system is a vital component of a snowblower, responsible for starting the engine and ensuring smooth operation. Understanding its function, diagnosing issues, and performing necessary repairs or maintenance can help keep your snowblower in optimal condition. Following preventive measures and seeking professional help when needed can ensure the longevity and reliability of your snowblower’s ignition system.

Additional Resources

If you require further assistance or information regarding snowblower ignition systems, the following resources may be helpful:

  • Snowblower User Manual: Refer to your snowblower’s user manual for specific instructions and diagrams related to the ignition system.
  • Online Forums and Communities: Participate in online forums and communities dedicated to snowblower maintenance and repairs. Here, you can ask questions and learn from the experiences of others.
  • Manufacturer’s Customer Support: Contact the manufacturer’s customer support for expert advice and assistance related to the ignition system of your snowblower. They can provide guidance and recommend authorized service centers for complex repairs.

How Do I Install Tire Chains On My Snowblower?

So, you’ve got a snowblower and you’re ready to tackle that winter wonderland in your driveway. But there’s one problem – your snowblower keeps slipping and sliding, making it impossible to clear all that snow. Well, fear not! In this article, we’ll guide you through the simple steps of installing tire chains on your snowblower. Yes, you heard that right – tire chains! These nifty devices will provide you with the traction you need to conquer even the iciest conditions. So, get ready to say goodbye to those frustrating slip-ups and hello to a clean, snow-free driveway! Installing tire chains on your snowblower is an important step to ensure better traction and grip while clearing snow. In this article, we will guide you through the process of choosing the right tire chains, preparing your snowblower, installing the chains properly, securing them, testing and adjusting, and provide you with some tips, tricks, and safety precautions. So let’s dive in and get your snowblower ready for the winter season!

How Do I Install Tire Chains On My Snowblower?

Choosing the Right Tire Chains

Consider the Type of Snow

Before purchasing tire chains for your snowblower, you need to consider the type of snow you will be dealing with. Different tire chains are designed for different types of snow conditions. For example, some chains are better suited for light snow, while others are more effective in heavy and wet snow. It’s essential to choose chains that are specifically designed to tackle the type of snow you usually encounter in your area.

Determine the Correct Size

The next crucial factor to consider is the size of the tire chains. Make sure to check your snowblower’s tire size and consult the manufacturer’s guidelines or the tire chain packaging for the correct chain sizing information. Using the wrong size chains can result in poor performance, damage to your snowblower, or even accidents. It’s better to take the time to measure your tires accurately and ensure you get the right size chains.

Select the Proper Chain Style

There are different styles of tire chains available in the market, each with its own purpose and benefits. The two common styles are ladder-style chains and diamond-pattern chains. Ladder-style chains provide excellent traction and are ideal for slippery and icy surfaces. Diamond-pattern chains, on the other hand, are better suited for deep snow and uneven terrains. Choose the chain style that best fits your needs and the type of snow you will be clearing.

Preparing Your Snowblower

Clear the Tire Area

Before installing the tire chains, it’s crucial to clear the tire area of any debris or obstacles. Make sure the area around the tires is free from ice, snow, or any other objects that could interfere with the installation process. Give the area a quick sweep or use a brush to ensure a clean and smooth surface for the chains to be placed.

Deflate the Tires

To make the installation process easier, it is recommended to deflate the snowblower tires slightly. This step allows the tires to become more pliable, making it easier to fit and adjust the tire chains. However, be cautious not to overdeflate the tires, as it may cause damage or affect the overall performance of your snowblower. Consult your snowblower’s manual or follow the manufacturer’s recommendations for the appropriate tire pressure.

Inspect the Tires for Damage

Before proceeding with the installation, it’s essential to inspect the tires for any signs of damage or wear. Look for cracks, punctures, or any other noticeable issues that may affect the performance of the tire chains or the snowblower itself. If you notice any damage, it’s best to replace the tires before installing the chains. Taking these precautions will ensure a smoother and safer snowblowing experience.

Installing the Tire Chains

Lay Out the Chains

Begin by laying out the tire chains on a flat surface, such as your garage floor or driveway. Ensure that the chains are untangled and free from any knots or twists. Taking the time to properly align the chains before installing them will make the process much easier and prevent any frustration.

Place Chains Over Tires

Now it’s time to place the chains over the snowblower’s tires. Start with one tire at a time and position the chains evenly over the tread. Check the tire chain packaging for any specific instructions on how to align the chains correctly. Pay attention to which side of the chain is meant to face the tire and ensure that the chains are overlapping each other evenly.

Ensure Proper Alignment

Once the chains are placed over the tires, make sure they are properly aligned. Adjust the chains as necessary to ensure that they are centered and evenly distributed around the entire circumference of the tires. It’s crucial to achieve proper alignment to maximize traction and prevent any potential damage to the chains or the snowblower.

How Do I Install Tire Chains On My Snowblower?

Securing the Tire Chains

Connect and Tighten Inner Chains

To secure the tire chains in place, start by connecting and tightening the inner chains. These chains run parallel to each other and are located on the inside of the tire. Connect the ends of the inner chains securely, making sure they are tightly fastened. Check for any excess slack or looseness in the chains and adjust accordingly.

Attach and Adjust Outer Chains

After securing the inner chains, it’s time to attach and adjust the outer chains. These chains run diagonally across the tire and connect with the inner chains. Attach the hooks or fasteners of the outer chains to the corresponding points on the inner chains. Once attached, adjust the tension of the outer chains to ensure a snug fit without over-tightening.

Check for Proper Tension

Before moving on, it’s essential to check that the tire chains have the proper tension. The chains should be securely fastened and tight enough to stay in place during use. However, be cautious not to overtighten them, as this can cause unnecessary strain on your snowblower’s tires. Give the chains a gentle tug to ensure they are properly tensioned and ready for action.

Testing and Adjusting

Test the Chains on Flat Terrain

Once the chains are installed and securely in place, it’s time to test them on flat terrain. Take your snowblower for a brief spin on a clear and level surface to ensure that the chains are functioning correctly. Pay attention to how the snowblower moves and observe if the chains help improve traction and stability. Use this opportunity to become familiar with how the chains affect the performance of your snowblower.

Make Necessary Adjustments

During the testing phase, you may notice that the chains require some adjustments. If you feel that the chains are too loose or too tight, take the time to make the necessary adjustments. Remember to consult the manufacturer’s instructions or guidelines provided with the tire chains for specific guidance on how to adjust them correctly.

Recheck the Tension

After making any necessary adjustments, recheck the tension of the tire chains. Give them a final inspection to ensure that they are securely tightened, evenly aligned, and free from any excessive slack or looseness. Taking the time to double-check the tension will provide you with peace of mind and ensure that the chains are ready to face even the heaviest snow.

Tips and Tricks

Practice Installation Before Snowfall

Before the first snowfall arrives, it’s a good idea to practice installing the tire chains on your snowblower. Doing so will help familiarize yourself with the process, making it quicker and easier when the time comes to install them in snowy conditions. Practicing in a controlled environment will also allow you to identify any issues or challenges that may arise and find ways to overcome them.

Add Tensioners for Extra Grip

If you want to enhance the traction and grip of your snowblower even further, consider adding tensioners to the tire chains. Tensioners are additional accessories that help keep the chains tight and secure, minimizing the chances of them loosening or coming off during use. Consult your local hardware store or the tire chain manufacturer for compatible tensioners that suit your specific tire chains.

Remove Chains When Not Needed

While tire chains provide significant benefits in snowy and icy conditions, they can be unnecessary and even harmful when used on dry or clear surfaces. It’s best to remove the chains from your snowblower when they are not needed to prevent any potential damage to the tires, the chains themselves, or the surfaces you may be clearing. Be mindful of the weather conditions and utilize the chains accordingly to prolong their lifespan.

Safety Precautions

Wear Protective Gloves

When installing, adjusting, or removing tire chains, it’s crucial to protect your hands by wearing appropriate gloves. Tire chains have sharp edges and can cause injuries if mishandled. Choose gloves that are durable and provide a good grip to ensure your safety and prevent accidents during the installation process.

Use a Lift or Jack for Stability

To ensure stability during the installation of tire chains, consider using a lift or jack to elevate your snowblower off the ground. This precaution will make the installation process more convenient and allow you to work with better visibility and access to the tires. Follow the manufacturer’s instructions for using the lift or jack safely to avoid any accidents or damage to your snowblower.

Avoid Overexertion

Installing tire chains can be physically demanding, especially in cold and slippery conditions. It’s important to avoid overexerting yourself during the process. Take breaks if needed, stay hydrated, and listen to your body. If you’re finding it too challenging, consider seeking assistance from a friend or a professional to ensure a safe and successful installation.

Frequently Asked Questions

Can Chains Be Used on All Snowblower Tires?

Tire chains can be used on most snowblower tires, but it’s crucial to double-check your snowblower’s manual or consult with the manufacturer to ensure compatibility. Some snowblower models may have specific restrictions or recommendations regarding the use of tire chains. Always follow the guidelines provided by the manufacturer to prevent any damage to your snowblower or tires.

Do Chains Affect the Snowblower’s Performance?

Yes, tire chains can significantly improve a snowblower’s performance on slippery or uneven surfaces. They enhance traction, stability, and maneuverability, allowing your snowblower to effectively clear snow even in challenging conditions. However, it’s important to use the correct tire chains for your specific snowblower and follow the installation instructions to ensure optimal performance.

Can Chains Damage Surfaces Other than Snow?

Tire chains are primarily designed to provide better traction on snow and ice. However, they can potentially cause damage to certain surfaces other than snow, such as delicate pavements, brick pavers, or smooth concrete. It’s essential to be mindful of the surfaces you are clearing and remove the tire chains when not needed to prevent any harm. Always prioritize safety and protect the surfaces you are working on.

Conclusion

Installing tire chains on your snowblower is a simple yet essential step to ensure optimal performance and safety while clearing snow. By considering the type of snow, determining the correct size, and selecting the proper chain style, you can choose the most suitable tire chains for your needs. Preparing your snowblower by clearing the tire area, deflating the tires slightly, and inspecting them for damage will ensure a smooth installation process.

When installing the tire chains, be sure to lay them out properly, align them correctly, and secure them tightly. Take the time to test the chains, make adjustments if necessary, and recheck the tension to ensure they are properly fitted. Following the tips and tricks provided, such as practicing installation beforehand and using tensioners for extra grip, will further enhance your snowblowing experience.

Remember to prioritize safety by wearing protective gloves, using a lift or jack for stability, and avoiding overexertion during the installation process. Addressing frequently asked questions regarding tire chains’ use and potential impact on surfaces will also provide you with a comprehensive understanding of their benefits and limitations.

Now that you have all the necessary information and steps to install tire chains on your snowblower, it’s time to gear up and get ready for a winter season filled with efficient and effective snow clearing! Stay safe, be prepared, and enjoy the convenience of using tire chains on your snowblower.

What Should I Do If My Snowblower Is Vibrating Excessively?

So, you’ve fired up your snowblower and suddenly noticed that it’s shaking like crazy. Not exactly the smooth, efficient snow-clearing experience you were hoping for, right? Well, fear not, because in this article, we’ll explore a few simple steps you can take to address that excessive vibration issue and get your snowblower running as smoothly as possible again. Whether it’s a minor adjustment or a more involved repair, we’ve got you covered. So, let’s get to the bottom of this vibrating mystery and tackle it head-on, shall we?

What Should I Do If My Snowblower Is Vibrating Excessively?

This image is property of www.ereplacementparts.com.

Check the Engine Mounts

Inspect the Engine Mounts for Damage

When your snowblower is vibrating excessively, one of the first things you should check is the engine mounts. Over time, the engine mounts can become worn or damaged, causing the engine to vibrate more than usual. Inspect the engine mounts carefully for any signs of cracks, tears, or other damage. If you notice any issues with the engine mounts, it’s important to replace them as soon as possible to prevent further damage to your snowblower.

Tighten Loose Engine Mounting Bolts

In addition to inspecting the engine mounts for damage, it’s also essential to check the tightness of the engine mounting bolts. Over time, these bolts can become loose due to the continuous vibrations of the snowblower. Grab a wrench or a socket set and carefully tighten any loose engine mounting bolts you come across. However, be cautious not to overtighten, as this can also cause damage. Ensuring that the engine mounts are secure and tightly fastened can significantly reduce excessive vibrations in your snowblower.

Inspect the Belts and Pulleys

Check for Worn or Damaged Belts

Excessive vibration in your snowblower can also be caused by worn or damaged belts. Therefore, it’s vital to inspect the belts for any signs of wear, such as cracks, fraying, or stretching. If you notice any damage to the belts, it’s crucial to replace them promptly to avoid any further issues. Worn-out belts can cause the snowblower’s components to function improperly, resulting in excessive vibrations and potential damage to the machine.

Tighten Loose Belt Tension

Loose belt tension can also contribute to excessive vibrations in your snowblower. Inspect the belt tension carefully and adjust it if necessary. Most snowblowers provide an adjustment mechanism that allows you to tighten or loosen the belt tension. Check your snowblower’s manual for instructions on how to adjust the belt tension properly. By ensuring the belts are properly tensioned, you can diminish vibrations and improve the overall performance of your snowblower.

Inspect and Lubricate Pulleys

While inspecting the belts, it’s a good idea to inspect the pulleys as well. Pulleys can accumulate dirt, debris, and even ice, which may cause the snowblower to vibrate excessively. Clean the pulleys thoroughly and ensure that there are no obstructions. Additionally, lubricate the pulleys as recommended by the snowblower’s manufacturer. Properly maintaining the pulleys will not only reduce vibrations but also extend their lifespan, ensuring smooth operation of your snowblower.

What Should I Do If My Snowblower Is Vibrating Excessively?

This image is property of www.ereplacementparts.com.

Examine the Auger and Impeller

Inspect the Auger for Damage or Misalignment

The auger is an essential component of your snowblower, responsible for breaking up and propelling the snow. If the auger is damaged or misaligned, it can result in excessive vibrations. Carefully examine the auger for any signs of cracks, chips, or bent blades. If you notice any damage, it’s important to replace the auger before further use to prevent worsening the problem. Additionally, check the alignment of the auger, as misalignment can also lead to increased vibrations in your snowblower.

Check the Impeller for Damage or Clogs

Similar to the auger, the impeller plays a crucial role in moving the snow out of the chute. If the impeller is damaged or clogged, it can disrupt the snowblower’s operation and cause excessive vibrations. Take the time to inspect the impeller for any signs of damage or obstructions. Remove any debris or clogs you find, ensuring that the impeller can rotate freely. By keeping the impeller in good condition, you can minimize vibrations and maintain optimal performance of your snowblower.

Inspect the Shear Pins

Check if Shear Pins are Broken or Missing

Shear pins are designed to protect the snowblower’s auger and engine from damage in case of a sudden impact with a hard object, such as a rock or ice chunk. However, they can break or go missing over time, leading to excessive vibrations. Take a moment to inspect the shear pins and determine if any of them are broken or missing. If you do find a damaged or missing shear pin, replace it immediately to prevent further damage to the auger or engine.

Replace Shear Pins if Necessary

If your inspection reveals broken or missing shear pins, it’s crucial to replace them promptly. Shear pins are relatively inexpensive and easy to replace, making it a simple maintenance task for you to tackle. Refer to your snowblower’s manual for the correct size and type of shear pins to purchase. Once you have the replacement shear pins, carefully install them according to the manufacturer’s instructions. By ensuring that all shear pins are intact, you can minimize vibrations and protect your snowblower from unnecessary damage.

What Should I Do If My Snowblower Is Vibrating Excessively?

This image is property of i.ytimg.com.

Check for Clogs in the Chute

Remove any Debris or Snow Buildup in the Chute

Another common cause of excessive vibration in a snowblower is clogs in the chute. Clogs can occur when snow or debris becomes stuck, restricting the airflow and causing the snowblower to vibrate. Inspect the chute carefully and remove any debris or snow buildup you find. Use a shovel or a brush to dislodge larger chunks of snow, and make sure that the chute is clear and unobstructed. Regularly clearing the chute will help maintain smooth operation and prevent unnecessary vibrations in your snowblower.

Evaluate the Skid Shoes and Scraper Blade

Inspect the Skid Shoes for Wear

Skid shoes are essential components of a snowblower, as they help provide clearance between the auger blades and the ground. Over time, skid shoes can become worn or damaged, leading to increased vibrations. Take a close look at the skid shoes and check for any signs of wear, such as excessive scraping or uneven surfaces. If you notice significant wear, it’s important to replace the skid shoes to ensure smooth operation and reduce vibrations in your snowblower.

Examine the Scraper Blade for Damage

The scraper blade is responsible for clearing snow from the ground, and if it’s damaged, it can cause excessive vibrations. Carefully examine the scraper blade for any signs of wear, chipping, or bending. Even a small amount of damage can affect the performance of your snowblower and lead to unwanted vibrations. If you notice any issues with the scraper blade, replace it promptly to maintain optimal functionality and minimize vibrations during operation.

What Should I Do If My Snowblower Is Vibrating Excessively?

This image is property of i.ytimg.com.

Adjust the Auger and Drive Control Cables

Ensure Proper Cable Tension

The auger and drive control cables are vital for controlling the operation of your snowblower. If these cables become damaged or stretched, it can lead to excessive vibrations. Check the tension of both the auger and drive control cables and ensure they are properly adjusted. If you notice any signs of damage or see that the cables are too loose or too tight, it’s essential to make the necessary adjustments. Follow the instructions outlined in your snowblower’s manual to ensure the correct tension and prevent unnecessary vibrations.

Check for Damaged or Stretched Cables

In addition to checking the tension of the cables, it’s important to inspect them for any signs of damage or stretching. Over time, cables can wear out, fray, or become stretched, affecting the performance of your snowblower and causing vibrations. Carefully examine the cables, from the control handles down to the corresponding components, and replace any damaged or stretched cables you find. By maintaining strong and properly functioning cables, you can significantly reduce vibrations and improve the overall operation of your snowblower.

Inspect the Wheels and Axles

Check for Bent or Damaged Wheels

The condition of the wheels on your snowblower can greatly impact the level of vibration during operation. Inspect the wheels carefully and check for any signs of damage, such as bends, cracks, or flat spots. Bent or damaged wheels can cause your snowblower to wobble and vibrate excessively. If you notice any issues with the wheels, replace them promptly to ensure smooth and stable operation, reducing vibrations and improving the overall performance of your snowblower.

Examine the Axles for Misalignment

Misaligned axles can also contribute to excessive vibrations in your snowblower. Take a close look at the axles and determine if they are aligned properly. If you notice any misalignment, use a wrench or adjustable pliers to carefully adjust the axles until they are straight and aligned. It’s essential to ensure that both axles are aligned correctly to prevent unnecessary vibrations and maintain the stability of your snowblower while in use.

What Should I Do If My Snowblower Is Vibrating Excessively?

This image is property of www.weingartz.com.

Verify the Engine RPM

Adjust the Engine RPM to Specifications

Another crucial aspect to consider when troubleshooting excessive vibrations in your snowblower is the engine’s RPM (revolutions per minute). Low or inconsistent RPM can lead to increased vibrations during operation. Consult your snowblower’s manual to determine the recommended engine RPM for optimal performance. Using a tachometer, adjust the engine RPM to meet the manufacturer’s specifications. By ensuring that the engine RPM is appropriately set, you can reduce vibrations and ensure smooth operation of your snowblower.

Seek Professional Assistance

Contact a Certified Technician if the Problem Persists

If you’ve followed all the previous steps and are still experiencing excessive vibrations in your snowblower, it may be time to seek professional assistance. Certified technicians have the expertise and knowledge to diagnose and resolve complex issues that may be causing excessive vibrations in your snowblower. Contact the manufacturer or a trusted repair service and explain the problem you’re facing. They will guide you through potential solutions or schedule a repair appointment if necessary. Remember, it’s essential to address the issue promptly to prevent further damage and maintain the optimal performance of your snowblower.

Can I Retrofit My Old Snowblower With Modern Features?

So you’re tired of manually clearing your driveway and you’re wondering if it’s possible to upgrade your old snowblower with modern features. The good news is, it’s definitely worth considering! With advancements in technology, retrofitting your snowblower can help you tackle those snow-filled days with ease and convenience. From enhanced power and efficiency to adjustable chute controls, there are various options available that can transform your outdated snowblower into a winter powerhouse. So, sit back, grab a hot cocoa, and let’s explore how you can bring your old snowblower into the 21st century.

Can I Retrofit My Old Snowblower With Modern Features?

Upgrading the Engine

Evaluating the Compatibility

Before you start upgrading your snowblower engine, it’s important to evaluate its compatibility for any modifications. Check if the current engine can handle the additional power requirements and if there are any compatibility issues with the existing parts. If the engine is compatible, you can move on to the next step.

Selecting a More Efficient Engine

To enhance the performance of your snowblower, consider selecting a more efficient engine. Look for engines that offer better fuel efficiency, higher power output, and improved reliability. A newer engine will not only make your snowblower more powerful but also more eco-friendly, reducing emissions and overall fuel consumption.

Installation Process

Once you have chosen the engine, it’s time to proceed with the installation process. Make sure to follow the manufacturer’s instructions and refer to any specific guidelines provided for your snowblower model. If you’re not confident in your mechanical abilities, it’s recommended to seek professional assistance to ensure a proper and safe installation.

Enhancing the Power System

Assessing the Power Output

Before upgrading the power system of your snowblower, assess the current power output. Determine if it meets your needs and if there is room for improvement. This evaluation will help you identify the areas that require attention and guide you in making the necessary enhancements.

Upgrading the Belts and Pulleys

Upgrading the belts and pulleys is a crucial step in enhancing the power system of your snowblower. Opt for high-quality belts and pulleys that are designed to handle increased power and torque. This upgrade will ensure smooth power transmission and improve the overall performance of your snowblower.

Adding a Dual-Stage System

Consider adding a dual-stage system to your snowblower for enhanced power and efficiency. A dual-stage snowblower features an impeller in addition to the auger, allowing it to handle heavy, wet snow more effectively. This upgrade will enable your snowblower to tackle even the toughest winter conditions with ease.

Upgrading Controls and Safety Features

Examining the Existing Controls

Take a closer look at the existing controls of your snowblower to identify any areas that require improvement. Pay attention to the ease of use, functionality, and accessibility of the controls. Upgrading the controls will enhance your overall snowblowing experience and make it more convenient.

Installing Electric Start

Installing an electric start system is a great addition to your snowblower, especially if the existing pull start system is difficult to operate or unreliable. Electric start systems are more convenient and eliminate the need for physical exertion to start the engine. This upgrade will save you time and effort during those cold winter mornings.

Upgrading Safety Features

The safety of both you and your snowblower is paramount. Consider upgrading the safety features of your snowblower to ensure its usability and protect yourself during operation. Enhancements such as improved safety guards, emergency shut-offs, and enhanced visibility features will provide added peace of mind while using your snowblower.

Can I Retrofit My Old Snowblower With Modern Features?

Improving the Auger System

Inspecting the Current Auger

Begin by inspecting the current auger of your snowblower. Check for any signs of wear and tear, damages, or performance issues. If the auger is in poor condition or not effectively clearing snow, upgrading it becomes necessary.

Installing a More Efficient Auger

Upgrade your snowblower’s auger system by installing a more efficient one. Look for augers that can handle different types of snow, from fluffy powder to heavy, compacted snow. A well-designed auger will enhance the snow-throwing capabilities of your snowblower and improve its overall efficiency.

Adding Adjustable Height Feature

Consider adding an adjustable height feature to your snowblower’s auger system. This will allow you to adapt to various snow depths, ensuring efficient snow removal regardless of the conditions. Being able to adjust the height of the auger will make your snowblower more versatile and increase its effectiveness.

Enhancing Maneuverability and Navigation

Evaluating the Existing Wheel System

Take a moment to evaluate the existing wheel system of your snowblower. Consider factors such as traction, maneuverability, and stability. Assess whether the current wheels are suitable for your needs or if an upgrade is necessary to improve the overall performance of your snowblower.

Upgrading to Track Drive System

Consider upgrading to a track drive system for improved maneuverability and traction. Track-driven snowblowers provide better traction in snowy and icy conditions, making it easier to navigate through deep snow. This upgrade will enhance the overall performance and control of your snowblower, especially on uneven terrains.

Adding Steering Assist

Enhance the maneuverability of your snowblower by adding a steering assist feature. This can be achieved through various mechanisms such as power steering or assisted steering systems. Steering assist will make turning and navigating your snowblower effortless, reducing strain on your arms and improving overall control.

Installing Heated Handgrips

Cold temperatures can make snowblowing an uncomfortable task. Installing heated handgrips on your snowblower will provide warmth and comfort during operation. Heated handgrips are easy to install and will make a significant difference in your snowblowing experience, especially during long hours of use.

Adding LED Lights

Enhance visibility and safety while operating your snowblower by adding LED lights. LED lights provide brighter illumination, making it easier to see and navigate in dark or low-light conditions. They also consume less power, adding efficiency to your snowblower’s electrical system.

Retrofitting Snow Sensor

Understanding Snow Sensors

Snow sensors are devices that automatically detect the presence of snow and trigger your snowblower to start operating. These sensors can be installed on your snowblower or in the surrounding area. They ensure that your snowblower only operates when necessary, saving you time and energy.

Installing the Snow Sensor System

If you’re interested in retrofitting your snowblower with a snow sensor system, consult the manufacturer’s instructions for installation. Typically, snow sensors are mounted in a strategic location to detect snowfall accurately. The sensor is then wired to your snowblower’s control panel to automate its operation based on snow conditions.

Upgrading the Chute Control System

Assessing the Current Chute System

Evaluate the existing chute control system of your snowblower. Determine if it meets your needs in terms of rotation range, ease of control, and throwing distance. If the current system is lacking in any of these aspects, it may be time for an upgrade to enhance the overall functionality of your snowblower.

Installing Electric Chute Control

Consider installing an electric chute control system for improved convenience and efficiency. Electric chute controls allow you to adjust the direction and angle of the chute without manual effort. This upgrade eliminates the need to step off the snowblower to make adjustments, making snowblowing quicker and easier.

Considering Other Modernization Options

Adding GPS Navigation

If you’re looking to take the modernization of your snowblower to the next level, consider adding GPS navigation. GPS navigation systems can assist in snowblowing by providing real-time location tracking, mapping, and route optimization. This advanced feature will make snowblowing more efficient and provide a better overall user experience.

Installing Remote Control System

For ultimate convenience, you can opt for a remote control system for your snowblower. With a remote control, you can start, stop, and control various functions of your snowblower from a distance. This feature allows you to operate the machine without having to be physically present, providing flexibility and ease of use.

Integrating Smartphone Control

Modernize your snowblower by integrating smartphone control capabilities. This allows you to control your snowblower’s functions directly from your smartphone, offering convenience and ease of use. Smartphone control systems often come with additional features such as performance monitoring and maintenance reminders, further enhancing the user experience.

In conclusion, retrofitting your old snowblower with modern features is indeed possible and can greatly enhance its performance, convenience, and safety. By upgrading the engine, power system, controls, safety features, auger system, maneuverability, and adding various modernizations, you can transform your old snowblower into a powerful and efficient machine that can tackle any snow-clearing task with ease. Choose the upgrades that best suit your needs and budget, and enjoy a winter season with a snowblower that’s equipped with modern features to make your snow-clearing experience more enjoyable and efficient.

How Do I Optimize My Snowblower For Deep Snow?

So, you wake up one winter morning to a snow-covered wonderland and your trusty snowblower is ready to save the day… or so you thought. As you begin your snow-clearing mission, you quickly realize that your machine is struggling to handle the deep, powdery snow. Frustration kicks in, and you find yourself wondering, “How do I optimize my snowblower for deep snow?” Well, fear not my friend, because in this article, we’re going to share some expert tips and tricks to help you conquer those snow drifts with ease. You’ll soon be gliding through the snow like a pro and making everyone on your street envious of your snow-clearing prowess.

How Do I Optimize My Snowblower For Deep Snow?

Choosing the Right Snowblower

When it comes to choosing the right snowblower, there are a few factors to consider. One of the first things to think about is the size of the snowblower. You want to make sure you choose a snowblower that is appropriate for the size of your driveway or the area you need to clear. A larger snowblower will have a wider clearing path, making it faster and more efficient for larger areas. However, if you have a smaller space to clear, a smaller snowblower may be more practical.

Another important factor to consider is the clearing capacity of the snowblower. This refers to how much snow the machine is able to remove in a single pass. If you live in an area that typically receives heavy snowfall, you will want to choose a snowblower with a high clearing capacity. This will allow you to clear your driveway or walkway quickly and efficiently, without having to make multiple passes.

Engine power is also an essential consideration when choosing a snowblower. A powerful engine will provide the necessary torque to handle the deep snow and push it through the chute. It is recommended to opt for a snowblower with a high horsepower rating to ensure it can effectively handle the toughest snow conditions.

Prepping the Snowblower

Before you tackle the deep snow, it’s essential to properly prepare your snowblower. Start by inspecting all the parts and replacing any that appear worn or damaged. This includes belts, paddles, and other components that may have experienced wear and tear over time. By replacing these parts, you can ensure that your snowblower operates at its optimal performance.

Old fuel can cause your snowblower’s engine to sputter or fail to start. To prevent this, drain the old fuel from the tank and clean the carburetor. It’s also a good idea to change the oil and check the lubrication of the machine to keep it running smoothly. Additionally, adjust the skid shoes and scraper blade to the appropriate height for the snow conditions you will encounter.

Lastly, take the time to tighten any loose bolts and nuts on your snowblower. Vibration and heavy use can cause these fasteners to loosen over time, so it’s important to ensure they are secure before taking on the deep snow.

Setting the Snowblower Height

Setting the right height for your snowblower is crucial to its performance. Begin by raising the front housing of the snowblower to the desired height. This will determine how deep the snow is cut and thrown by the machine. Adjusting the skid shoes, which are located on the sides of the auger housing, can further fine-tune the height. By setting them lower, you can cut through compacted and hard-packed snow, while a higher setting is suitable for lighter snow.

To find the perfect height setting for your snowblower, it’s a good idea to test different heights and observe the results. This will allow you to determine the most efficient height for clearing deep snow and achieving the optimal throwing distance.

How Do I Optimize My Snowblower For Deep Snow?

Adding Weight and Traction

When dealing with deep snow, adding weight and improving traction on your snowblower can greatly enhance its performance. One way to achieve this is by attaching wheel weights to the tires. These weights increase the downward force on the tires, providing better traction and reducing slippage.

Installing tire chains is another effective method to improve traction in deep snow. The chains grip the snow and ice, allowing the snowblower to move forward more easily. Snow tires or snow bands can also be used to enhance traction, especially on larger snowblowers with larger tires.

If you find that your snowblower still lacks traction, applying traction mats or sandbags to the rear of the machine can provide additional grip. These items create extra resistance against the snow, preventing the wheels from spinning and increasing the overall traction.

Improving Throwing Distance

To optimize your snowblower for deep snow, it’s important to ensure that it can throw the snow a sufficient distance. Start by clearing any obstructions from the auger housing, such as twigs or rocks, as these can hinder the flow of snow. Next, check and adjust the auger paddles to make sure they are in good condition and properly aligned. These paddles are responsible for feeding the snow into the chute.

Inspecting and adjusting the impeller is also essential for optimal snow throwing. The impeller is located at the end of the auger and is responsible for propelling the snow out of the chute. Make sure it spins freely and is not damaged or clogged.

If the belts on your snowblower are worn or loose, they can affect the throwing distance. Replace any belts that show signs of wear or adjust them to the appropriate tension. Lastly, clear any snow buildup in the snow chute and adjust the chute control to ensure the snow is directed where you want it to go.

Using the Correct Technique

To make the most of your snowblower’s capabilities in deep snow, it’s important to use the correct technique. Start by using a slow forward speed to give the machine enough time to properly clear the snow. Taking smaller snow cut depths can also help prevent clogging and ensure a smoother clearing process.

Overlap each pass slightly to ensure that you cover the entire width of the area you are clearing. This will help prevent any missed patches of snow and ensure a thorough job. Utilizing the full throttle of your snowblower will provide the necessary power to cut through the deep snow effectively.

Lastly, avoid overloading the machine by trying to clear too much snow at once. This can strain the engine and lead to clogging. It’s best to take smaller, manageable scoops of snow to maintain the machine’s efficiency and prevent any unnecessary wear and tear.

Considering Snow Conditions

When using your snowblower in deep snow, it’s important to consider the specific snow conditions. Wet and heavy snow can be more challenging to clear, as it tends to clog the machine more easily. Take caution and adjust your technique accordingly, taking smaller and slower passes to prevent clogging.

Ice or hard-packed snow can also pose challenges. Use caution when encountering these conditions, as they can be more difficult to clear and may require a more aggressive approach. Take your time and adjust the height and technique to effectively break up and remove the ice or hard-packed snow.

When dealing with deep snow, it’s important to handle it gradually and steadily. Trying to clear large amounts of deep snow at once can overwhelm the machine and lead to clogging. Take it one pass at a time and be patient to ensure efficient and effective snow removal.

On the other hand, loose and light snow can be cleared more efficiently with the appropriate snowblower settings. Adjust the height accordingly to avoid removing excessive amounts of snow, which can make the process less efficient and lead to unnecessary wear on the machine.

Safety Precautions

While using a snowblower can make clearing deep snow easier and more efficient, it’s essential to take certain safety precautions. Make sure to wear appropriate safety gear, such as goggles or safety glasses to protect your eyes from flying debris. It’s also a good idea to wear insulated gloves to keep your hands warm and protected.

Be aware of your surroundings when operating a snowblower. Avoid clearing snow near people or objects that could be damaged by the snow being thrown. Make sure to look out for pets, children, and any other potential hazards in the area.

Avoid wearing loose clothing, as it can get caught in the machine’s moving parts. Make sure to wear fitted clothing and secure any long hair or loose accessories.

Never attempt to clear snow with your hands or feet, even if the machine is turned off. Use a shovel or other tool to clear any snow that may have gathered in the auger or chute. It’s always better to prioritize safety and avoid any potential accidents.

Maintenance Tips

Proper maintenance is crucial for keeping your snowblower in optimal condition, especially when preparing it for deep snow. After each use, make sure to clean your snowblower thoroughly. Remove any snow or debris that may have accumulated on the machine to prevent clogging and ensure smooth operation.

During the off-season, store your snowblower properly. Drain the fuel tank and perform any necessary maintenance to prevent any issues when you need to use it again. Following the manufacturer’s maintenance schedule is vital to keep your snowblower running smoothly and prevent any unnecessary breakdowns.

Additionally, regularly inspect all parts of your snowblower and replace any components that show signs of wear or damage. This includes belts, paddles, and other moving parts that may wear out over time. By staying on top of maintenance and replacing worn-out parts, you can ensure that your snowblower operates at its best.

Seeking Professional Help

If you are unsure about any aspect of optimizing your snowblower for deep snow, it may be beneficial to seek professional help. Consider consulting with a professional snowblower service to ensure that your machine is properly maintained and adjusted for the specific snow conditions you will encounter.

If you have any questions or concerns about your snowblower, don’t hesitate to contact the manufacturer or an authorized dealer. They will be able to provide you with guidance and support to ensure that your snowblower is functioning optimally and ready to tackle the deep snow with ease.

By following these tips and properly optimizing your snowblower for deep snow, you can make the winter months more manageable and enjoy the convenience of a cleared driveway or walkway. Prioritize safety, regular maintenance, and proper technique to ensure that your snowblower serves you well for many winters to come.

How Do I Adjust The Chute Direction On My Snowblower?

So, you’ve got a snowblower and you’re ready to tackle that pile of snow in your driveway, but there’s just one problem – the chute isn’t pointing in the right direction. Don’t worry, we’ve got you covered. In this article, we’ll show you exactly how to adjust the chute direction on your snowblower, so you can effectively and efficiently clear away the snow without any hassle. Whether you’re a snowblower novice or a seasoned pro, we’ve got the step-by-step instructions you need to get that chute pointing exactly where you want it.

How Do I Adjust The Chute Direction On My Snowblower?

Determining the Chute Direction

When it comes to operating a snowblower, adjusting the chute direction is an essential task. The chute is responsible for directing the discharged snow in a desired direction. Whether you want to throw the snow to the right, left, or straight ahead, understanding how to adjust the chute direction is crucial. In this article, we will provide you with a comprehensive guide on various methods you can use to adjust the chute direction on your snowblower. From manual adjustments to electric and hydraulic options, we will cover it all. So let’s dive in and get your snowblower ready to tackle the winter weather!

Understanding the Chute Control

Before we delve into the different techniques for adjusting the chute direction, it’s essential to understand how the chute control works. Typically, snowblowers are equipped with a chute control mechanism that allows you to change the direction of the chute. This control can be in the form of a lever, crank, rod, or even an electric or hydraulic mechanism, depending on the model of your snowblower.

The chute control determines the angle at which the discharged snow will be thrown. By manipulating this control, you can decide whether the snow will be thrown to the right, left, or straight ahead. Familiarizing yourself with the specific chute control of your snowblower is the first step towards adjusting the chute direction effectively.

Locating the Chute Adjustment

Once you understand the chute control mechanism on your snowblower, it’s time to locate the chute adjustment itself. The chute adjustment refers to the specific component or part that allows you to change the direction of the chute. It varies depending on the model and manufacturer of your snowblower.

In most cases, the chute adjustment can be found at the top of the chute itself. Look for a lever, crank, or some form of control near the chute that is specifically designed to adjust the chute’s direction. If you are having trouble locating the chute adjustment, referring to the user manual of your snowblower is a great idea. The manual typically provides detailed instructions and diagrams to help you find the chute adjustment quickly.

Checking the Chute Range

Before making any adjustments, it is crucial to check the chute range of your snowblower. The chute range refers to the sweep or arc through which the chute can rotate. To determine the chute range, observe the movement of the chute when you operate the chute control.

Start by setting the chute control to the default or neutral position and then rotate it to each extreme end. Take note of the distance covered by the chute during each rotation. This will give you an idea of the range of motion available for adjusting the chute direction. Familiarizing yourself with the chute range will help you understand the limitations and possibilities when it comes to adjusting the chute direction on your snowblower.

Manual Chute Adjustment

One common method of adjusting the chute direction on a snowblower is manual adjustment. This method allows you to physically manipulate the chute to the desired direction. Manual chute adjustment is typically achieved using a chute deflector, a rotating mechanism, and a locking mechanism.

Using the Chute Deflector

The chute deflector is a component of the snowblower that controls the vertical angle of the discharged snow. It determines whether the snow will be thrown higher or lower. Adjusting the chute deflector can be done manually by locating the deflector control and changing its position.

To adjust the chute deflector, find the deflector control usually located on the chute itself. By moving the deflector up or down, you can change the angle at which the snow is discharged. For example, if you want the snow to be thrown higher, push the deflector upward, and if you want the snow to be thrown lower, push the deflector downward. Experiment with different positions to find the ideal angle for your specific snow-clearing needs.

Rotating the Chute Manually

In addition to adjusting the vertical angle, you can also manually rotate the entire chute to change the horizontal direction of the discharged snow. Manual rotation is especially useful when you want to throw the snow to the right or left side.

To rotate the chute manually, look for a rotating mechanism that allows you to turn the chute. This mechanism is usually located near the base of the chute or on the side of the snowblower. Grip the rotating mechanism and rotate it in the desired direction. Keep in mind that some snowblowers may require you to hold a lever or release a lock before you can rotate the chute freely.

Locking the Chute in Position

After adjusting the chute deflector and rotating the chute manually, it is essential to lock the chute in position to ensure it stays in the desired direction during operation. The locking mechanism prevents the chute from accidentally rotating or changing direction while you are clearing snow.

To lock the chute in position, locate the locking mechanism near the rotating mechanism or on the chute itself. Engage the locking mechanism by pushing it or sliding it into the locked position. Make sure you test the chute’s stability by trying to rotate it after locking it. If the chute remains secure and does not move, you have successfully locked it in position.

Adjusting the Chute Direction Lever

Many snowblowers feature a chute direction lever as a convenient way to adjust the chute’s direction. This lever allows you to change the direction of the discharged snow without any manual rotations or adjustments.

Locating the Direction Lever

To adjust the chute direction using the lever, first, you need to locate it on your snowblower. The direction lever is typically located within easy reach of the operator, often near the handlebars or control panel. It may be labeled with directional arrows indicating the possible positions of the chute.

Look for a lever that can be easily moved from side to side or up and down. The lever should feel sturdy and have clear markings to indicate the positions it can be set to.

Releasing the Direction Lever

Before adjusting the chute direction using the lever, it’s crucial to release any existing position lock or engagement. Some snowblowers have a locking mechanism that keeps the direction lever in place. Look for a release button, lever, or pedal that can disengage the lock.

Engage the release mechanism to free the direction lever. This will allow you to move the lever and adjust the chute direction without any restrictions.

Positioning the Chute

With the direction lever released, you can now adjust the chute direction by simply moving the lever to the desired position. Most snowblowers equipped with a direction lever have pre-determined positions that correspond to specific directions. These positions are usually indicated by visual markers or labels.

To change the chute direction, move the direction lever to the position that aligns with your desired direction. For example, if you want to throw the snow to the right, move the lever to the rightmost position indicated on the lever or control panel. Similarly, move the lever to the leftmost position for left-directional discharge and the center position for throwing the snow straight ahead.

How Do I Adjust The Chute Direction On My Snowblower?

Chute Control Rod Adjustment

Another method of adjusting the chute direction on a snowblower involves manipulating a control rod. The control rod allows you to fine-tune the chute direction by adjusting its length and position.

Identifying the Control Rod

To begin the chute control rod adjustment, you first need to locate the rod on your snowblower. The control rod is typically positioned close to the chute adjustment mechanism, such as a crank or lever. It may extend from the chute itself or connect to a control handle.

Inspect your snowblower to find a rod connected to the chute or chute control mechanism. The rod should be noticeable and accessible for adjustment.

Loosening the Control Rod

Before making any adjustments, ensure that the control rod is loose and not fixed in position. Tightening or securing the control rod could restrict your ability to adjust the chute direction effectively.

Check for any nuts or bolts securing the control rod and use appropriate tools to loosen them. This will enable you to freely adjust the length and position of the control rod.

Setting the Desired Chute Direction

Once the control rod is loose, you can adjust the chute direction by changing the length or position of the rod. Lengthening the control rod will move the chute in the direction specified by your snowblower’s design, whereas shortening it will shift the chute in the opposite direction.

Experiment with different lengths and positions of the control rod until you find the desired chute direction that suits your snow-clearing needs. Take note of the adjustments you make to help you recreate the same chute direction in the future if necessary.

Chute Crank Adjustment

Some snowblowers are equipped with a chute crank mechanism that provides a straightforward way to adjust the chute direction. The crank allows you to rotate the chute horizontally without the need for manual rotations or control rods.

Locating the Chute Crank

To adjust the chute direction using the crank, you first need to locate it on your snowblower. The chute crank is usually situated near the base of the chute, below the discharge opening. It may be in the form of a handle, knob, or rotating mechanism.

Inspect your snowblower’s chute assembly to find the crank. It should be easily visible and accessible for adjustment.

Repositioning the Chute Crank

To change the chute direction using the crank, you simply need to reposition it. Grab hold of the crank and rotate it in the desired direction. Depending on your snowblower’s design, you may need to turn the crank clockwise or counterclockwise to achieve the desired direction.

Some snowblowers may have specific markers or labels on the crank to indicate the different positions and directions. Refer to these markers or labels to help you adjust the chute direction accurately.

Aligning the Chute

After repositioning the chute crank, it is crucial to align the chute properly. Ensure that the chute is securely fixed in the new direction and that the crank is in a locked position, if applicable. By aligning the chute correctly, you prevent any mishaps or unintended changes in direction while operating the snowblower.

Take a moment to verify that the chute is facing the desired direction and is stable. If necessary, make any additional adjustments to the crank or chute to achieve the desired alignment.

Electric Chute Rotation Adjustment

For added convenience and ease of use, some snowblowers feature an electric chute rotation mechanism. This mechanism allows you to adjust the chute direction at the push of a button, eliminating the need for manual or crank adjustments.

Understanding Electric Chute Rotation

Electric chute rotation utilizes an electric motor or actuator to adjust the chute direction. This motor is usually controlled by a switch or button located on the snowblower’s control panel or handlebars. When activated, the motor rotates the chute to the desired position.

By utilizing electric chute rotation, you can effortlessly change the chute direction without the need for physical exertion or manual adjustments.

Activating Electric Chute Control

To adjust the chute direction using the electric chute rotation mechanism, you need to activate the control. Find the switch or button that controls the electric chute rotation on your snowblower. It should be clearly labeled and easily accessible from the operator’s position.

Press or toggle the switch to activate the electric chute control. This will initiate the rotation of the chute to the default or neutral position.

Setting the Chute Direction

Once the electric chute control is activated, you can now set the desired chute direction without any physical efforts. Look for additional switches or buttons on the control panel or handlebars that control the specific chute positions.

Depending on your snowblower model, the chute positions may be indicated by labeled buttons or by selecting different modes of operation. Select the appropriate button or mode that aligns with your desired direction. For example, if you want to throw the snow to the right, press the corresponding button or select the right-chute mode.

Hydraulic Chute Rotation Adjustment

In some high-end snowblower models, hydraulic systems are employed to adjust the chute direction. Hydraulic mechanisms provide a reliable and powerful method of chute rotation, especially for heavy-duty snowblowers.

Understanding Hydraulic Chute Rotation

Hydraulic chute rotation utilizes hydraulic fluid pressure to control and adjust the chute direction. A hydraulic system consists of hoses, valves, and pumps that work together to provide the necessary force for chute rotation. By manipulating the hydraulic controls, you can change the direction of the chute effortlessly.

Hydraulic systems are often found in commercial or heavy-duty snowblowers due to their robustness and precision.

Inspecting the Hydraulic System

Before adjusting the chute direction using the hydraulic system, it is essential to inspect the system for any visible damages or leaks. Examine the hydraulic hoses, connections, and components for any signs of wear or deterioration. If you notice any issues, it is recommended to seek professional assistance for repair or replacement.

In addition to visual inspection, ensure that the hydraulic fluid levels are adequate. Low hydraulic fluid can affect the performance and reliability of the hydraulic system, including the chute rotation.

Adjusting the Chute Rotation

Once you have inspected the hydraulic system and ensured its proper functioning, adjusting the chute rotation becomes relatively straightforward. Locate the hydraulic controls on your snowblower. These controls are usually in the form of levers or buttons that allow you to manipulate the hydraulic system.

Using the hydraulic controls, activate the system and select the desired chute direction. Depending on your snowblower’s hydraulic system, this may involve moving levers to specific positions or pressing buttons that correspond to different chute directions.

Exercise caution when operating the hydraulic controls, as the hydraulic system can exert significant force. Make slow and deliberate movements to avoid sudden or jerky motions.

Replacing or Repairing Chute Accessories

Over time, the chute and its associated accessories may experience wear and tear or sustain damage. When this happens, it is essential to replace or repair the damaged parts to ensure optimal performance.

Replacing the Chute Deflector

The chute deflector, responsible for controlling the vertical angle of the discharged snow, can be subject to damage or breakage due to the forceful ejection of snow and other debris. If you notice any cracks, dents, or deformities in the chute deflector, it is best to replace it.

To replace the chute deflector, first, ensure that you have a suitable replacement part. Consult the user manual or seek guidance from a professional if necessary. Once you have the replacement deflector, remove the damaged deflector by loosening any screws, bolts, or latches holding it in place. Then, attach the new deflector using the appropriate fasteners or mounting mechanisms.

Repairing Damaged Chute Parts

In addition to the chute deflector, other parts of the chute assembly may require repairs if they become damaged. This could include the chute itself, the rotating mechanism, or any other components related to the chute direction adjustment.

Inspect the chute assembly for any signs of damage or malfunction. If you identify any issues, evaluate whether the part can be repaired or needs to be replaced. Minor damages such as dents or bends can sometimes be fixed using appropriate tools or techniques. However, if the damage is severe or compromises the functionality of the snowblower, it is advisable to replace the damaged parts.

Replacing the Chute Control Handle

The chute control handle allows you to manipulate the chute direction adjustment mechanisms, such as levers, cranks, or switches. Over time, the handle may wear out or become damaged, making it difficult to adjust the chute direction effectively.

To replace the chute control handle, begin by disconnecting it from the chute assembly or control mechanism. This may involve removing screws, pins, or other fasteners holding the handle in place. Once the old handle is removed, secure the replacement handle by connecting it to the control mechanism using the appropriate fasteners. Test the new handle to ensure smooth operation and secure attachment.

Troubleshooting Chute Direction Problems

Despite your best efforts, you may encounter various issues with the chute direction on your snowblower. Here are some common problems you may encounter and possible solutions to help troubleshoot and resolve them.

Chute Not Rotating Properly

If the chute is not rotating properly or gets stuck during operation, there may be several factors contributing to the issue. First, check for any obstructions or debris that may be hindering the chute’s movement. Clear away any snow, ice, or foreign objects that may be causing the problem.

Inspect the chute adjustment mechanism, such as the lever, crank, or hydraulic controls, for any signs of damage or malfunction. Ensure that the mechanism is properly lubricated and free from any obstructions. If you notice any issues with the adjustment mechanism, consult the user manual or seek professional assistance for repair or replacement.

Chute Jamming Issues

Sometimes, the chute may become jammed, preventing it from rotating or adjusting smoothly. Debris, ice buildup, or even frozen snow can cause such a jam. To resolve this issue, first, turn off the snowblower and ensure that it is in a safe and stable position.

Inspect the chute for any visible obstructions or blockages. Use a snow shovel, broom, or any suitable tool to remove any debris or ice buildup obstructing the chute movement. If the snow is frozen solid, you may need to apply an ice melter or warm water to loosen it before removing the obstruction.

Chute Direction Stuck

If you find that the chute direction is stuck and cannot be changed, first, ensure that all the appropriate adjustments, levers, or controls are in their unlocked or released positions. In some cases, the locking mechanisms may be engaged, preventing the chute from freely moving.

Inspect the chute adjustment mechanism for any signs of damage, wear, or corrosion. If the mechanism is damaged, it may need repair or replacement. Similarly, check the chute assembly for any visible issues that may cause the chute direction to be stuck.

Maintenance and Precautions

Regular maintenance and proper precautions are essential for keeping your snowblower and its chute assembly in optimal condition. Here are some maintenance tasks and precautions to consider:

Lubricating Chute Components

To ensure smooth operation and prevent wear, it is important to lubricate the chute components regularly. Consult the user manual for specific instructions on lubrication points and recommended lubricants. Apply lubricants to rotating parts, hinges, and any other contact points as indicated. Be sure to clean off any excess lubricant to avoid attracting dirt or debris.

Cleaning the Chute Assembly

After each use, clean the chute assembly to remove any snow, ice, or debris that may have accumulated. Use a snow shovel, brush, or any suitable tool to clear the chute thoroughly. Pay attention to the chute deflector, rotating mechanisms, and other components that may collect snow or ice. Use caution when cleaning to avoid contacting the moving parts or getting your hands or tools caught in the assembly.

Inspecting and Adjusting Drive Belts

The drive belts on your snowblower are an integral part of the chute assembly operation. Regularly inspect the drive belts for signs of wear, fraying, or damage. Replace any damaged or worn belts promptly to prevent chute direction issues.

If necessary, adjust the tension of the drive belts according to the manufacturer’s instructions. Ensure that the belts are properly tensioned and aligned for optimal performance. Improperly tensioned or misaligned drive belts can affect the functionality of the chute assembly.

In conclusion, adjusting the chute direction on your snowblower is an essential skill to master for efficient snow clearing. Whether you opt for manual adjustments, lever controls, hydraulic or electric mechanisms, understanding the specific chute controls and practicing proper maintenance will ensure smooth operation and optimal performance. By following the methods and precautions outlined in this article, you can confidently navigate the winter weather and keep your property clear of snow with ease. Stay safe, stay warm, and happy snowblowing!